The Search
The search function provides you with a powerful tool for finding the desired information quickly and reliably, even with large amounts of data.
The external tool SOLR has been implemented for the search. On large iAGENT installations it could be installed on a saparate server to increase search performance.
Click the ![]() -icon in the menu bar to open the search menu:
-icon in the menu bar to open the search menu:
Under My favourites you will find search preferences that you saved earlier. You can open them to apply the settings in a new search or to modify them as a basis for a new search.
Click on Advanced search if you want to perform a precise search with a variety of criteria.
Inhalt/Content
Advanced search

The advanced search is a comfortable tool for the precise search for a specific mail or several mails with the same attributes. For this purpose, novomind iAGENT offers not only the classic input field for keyword search but also numerous selectable search parameters that can be combined as required:
Enter an ID or any keywords or parts of words from the searched content you want to search for. The system does not distinguish between upper and lower case.
This search field searches for matches in the following entities:
– ID
– Process-ID
– Ref-ID (since iAGENT version 12.16)
– Content
– Subject
– Memos
– Status
– Date
– Properties
Shall only be searched in specific entities, they can be selected through the context menu that appears on clicking on the filter icon. As soon as a specific entity is selected, the filter icon becomes red.
|
The search field searches for whole words by default. Fuzzy search Exact search Search logic: |
Determine the period in which the mails you are looking for were received. You can select a predefined interval or define an individual period using the calendar.
Determine the period in which the mails you are looking for were processed. You can select a predefined interval or define an individual period using the calendar.
Select one or more tenants. If you do not make a selection, the system searches in the mails of all tenants.
First, choose whether you want to display normal categories or main categories. Then select one or more categories. If you do not make a selection, the system searches in the mails of all categories.
Select one or more routing tags assigned to the mails you are looking for. If you do not make any selection, the system searches in the mails with all routing tags.
Select one or more agents. If you do not make a selection, the system searches in the mails of all agents.
Select one or more customers. If you do not make a selection, the system searches in the mails of all customers.
The search is started by pressing [ENTER] or clicking on ![]() . Use
. Use ![]() to restore the default settings.
to restore the default settings.
Please note that further module specific search options are available on the tabs below. Shall only these module specific search parameters be used, the values can be set directly in these fields before executing the search the first time!
If you use certain combinations of search parameters regularly, the ![]() -Button allows you to save your current search settings as favourites. You can also export the result of your search as an Excel file using the
-Button allows you to save your current search settings as favourites. You can also export the result of your search as an Excel file using the ![]() button.
button.
Your saved favourites can be found in the search menu under My favourites:

|
If you use relative time periods (for example, last week) in the search configuration of a saved search, the search result also refers to the relative time period. The search result “moves” with time (also indicated by the arrow-icon |
In addition to the general search parameters mentioned above, you will find specific search parameters for the novomind iAGENT modules under the tabs Mails, Chats and Claims.
Mails tab

The columns that shall be displayed are configurable through the dropdown ![]() beside the Actions button above the list.
beside the Actions button above the list.
The filters explained below are used to further specify the result list from the detailed search. The system remembers the set filters and uses them again the next time you log on. Click the ![]() button to return to the default filter settings.
button to return to the default filter settings.
Select the status of the mail you are looking for. Multiple selections are permitted. If you do not make a selection, the system searches for mails of all statuses.
Select which inbox account was used to receive the mail you were looking for. Multiple selections are permitted. If you do not make a selection, the system searches in the mails of all incoming accounts.
Select via which channel the searched mail was received. Multiple selections are permitted. If you do not make a selection, the system searches in the mails of all channels.
If you are looking for a mail that has been completed using a transaction code, you can select the transaction code here. Multiple selections are permitted. If you do not make a selection, the system searches both in the completed mails (with or without final code) and in the mails that are not completed.
The reference ID is an individual character that identifies the author of the mail or an external system. Typically, this is the customer number, but you can also define other characters (for example, the insurance certificate number) as Ref ID.
Search for an entire email address or parts of an email address. Also select whether it is a To-, From-, CC– or Reply To address.
Allows you to add more dropdowns with additional filtering options. The dropdowns added in this way can be removed by clicking on the adjacent X.
For example Attachment: Click on the filter to search for a file name or type. To search for file types, you can use the wild card (*) – for example, type ‘*.jpg’ to search for files of JPG type.
The list of additional filter options can be extended by user-defined properties, so-called mail properties. These mail properties can be set either via the CRM tab, the knowledge base or customer-specific backend adjustments.
Shall only these module specific search parameters be used, the values can be set directly in these fields before executing the search the first time.
Chats tab

The filters explained below are used to further specify the result list from the detailed search. The system remembers the set filters and uses them again the next time you log on. Click the ![]() button to return to the default filter settings.
button to return to the default filter settings.
Determine the status of the chat you are looking for. Multiple selections are permitted. If you do not make a selection, the system searches for chats of all statuses.
Determine through which Messenger incoming account the chat was received. Multiple selections are permitted. If you do not make a selection, the system will search in all Messenger incoming accounts.
Select the channel on which the chat you are looking for was received. Multiple selections are permitted. If you do not make a selection, the system searches in the chats of all channels.
If you are looking for a chat that has been completed with a transaction code, you can determine the transaction code. Multiple selections are permitted. If you do not make a selection, the system searches in the completed chats (with or without transaction code).
Specify the name or type of file attachment that the chat you are looking for has. To search for file types, you can use the wild card (*) – for example, type ‘*.jpg’ to search for files of JPG type.
Allows you to add more dropdowns with additional filtering options. The dropdowns added in this way can be removed by clicking on the adjacent X.
-
- Language (since version 12.22)
-
- Not accepted by agent (since version 12.21): Any agent: All chats for which there is any agent who has not accepted.
-
- Forwarded by agent (since version 12.21): Any agent: All chats for which there is any agent that has forwarded.
Shall only these module specific search parameters be used, the values can be set directly in these fields before executing the search the first time.
![]()
Finished, asynchronous messenger chats may be resumed through the advanced search.After selecting the chat in the search result, you may use the button Actions –> Resume. After the chat has been resumed, it will be forwarded to an agent with the corresponding capacity- but preferred to the agent that chatted with this customer lastly. Please be aware of the WhatsApp/Facebook 24 hours limit, which is still valid after resuming the chat.
Claims tab

The search for claims includes – as every other search tab – the search fields from the tabs above and adds its specific search fields.
Claims can be searched through the following criteria:
Status of the claim (open, closed or repoened by default)
Priority of the claim (Very low to Very high). The priority is set by the claim responsible agent individually.
Deadline (date) of the claim. For easier entering the date, the calendar picking dialogue appears on clicking on the arrow on the right-hand side of this field.
Is this claim legitimated? The agent is able to decide whether yes or no.
The connected compensation ID
The Generic Fields that have the sign “Visible” = “In the list” are listed also search-able here.![]() Only generic fields of type “String” will be searched.
Only generic fields of type “String” will be searched.
Shall only these module specific search parameters be used, the values can be set directly in these fields before executing the search the first time!
Call tab
The call tab is only visible when the iAGENT Call module has been activated.

The following filters are to further decrease the search result count. They are call specific and thus are on the lower search area on the call tab.
The unique call id of the PBX
The caller’s telephone number
The number that the caller dialed
Allows you to add more dropdowns with additional filtering options. The dropdowns added in this way can be removed by clicking on the adjacent X.
-
- Language (since version 12.22): The language of the call (which has been detected by the IVR or special numbers)
-
- Transaction Code: The transaction code of the call which the agent set after the call has been finished.
-
- Location: The location has been set by the IVR.
-
- Not accepted by agent (since version 12.21): Any agent: All calls for which there is any agent who has not accepted.
-
- Forwarded by agent (since version 12.21): Any agent: All calls for which there is any agent that has forwarded.
Detail view
Selecting a call from the list opens a detailed view with further information about this call.
General tab
This tab contains basic information about the call, such as the associated contact, the phone numbers used, the call ID, category, client and location, as well as the time and duration of the call.
Course tab
This tab lists which stations a call has passed through in the system and when. The course messages have the following meanings:
| Course message | Explanation |
| Received (in IVR) | The incoming call was answered by the IVR (automatic voice response system). |
| Enqueued | The incoming call has been queued to the IVR (automatic voice response system). |
| Tags changed | One or more routing tag(s) on a call have been changed – i.e. removed from and/or added to the call. |
| Recategorized | The call was recategorized. |
| Dequeued (in IVR) | The call has been removed from the queue in the IVR (automatic voice response system). This may be the result of an automated process in iAGENT or may have been initiated by a supervisor or agent. |
| Ringing | The agent phone rang. |
| Connected to agent | The participants were connected with each other. |
| Forwarded externally | The call was forwarded to a destination outside iAGENT. This may have been the result of an automated process in iAGENT or initiated by a supervisor or agent. |
| Agent disconnected (in IVR) | The connection was terminated by the agent and the call was routed back to the IVR (automatic voice response system). |
| Finished | The connection was terminated. |
Contact tab
Here you can find information about the contact of the caller, i.e. the corresponding ID, name, client as well as additional phone numbers of this contact.
Journey tab
Here you can find the journey of this contact.
Contact Search
On the tab Contacts, all existing contacts may be found.

The search field searches for the following entities by default:
- ID
- External-ID
- Name
- Email address
- Phone Number
Through clicking on the filter icon, specific entities can be considered in the search if you want to search only for the values of the external-id. As soon as such entry is activated, the icon becomes red.
The contacts may be filtered by their tenants.![]() Please keep in mind that only as of iAGENT version 11.16, the tenants will be saved on the contacts themselves. In iAGENT versions <= 11.16, the search by tenants will not deliver any results.
Please keep in mind that only as of iAGENT version 11.16, the tenants will be saved on the contacts themselves. In iAGENT versions <= 11.16, the search by tenants will not deliver any results.
After clicking a found contact entry, the details dialogue will appear.
Enter a date using the calendar icon
The search and a number of novomind iAGENT functions (e.g. forward and resubmission functions) either require a date or daterange to be entered. There are two options for easily defining the start and end time for any given period:
- The calendar option:

This enables a fixed start and end time to be entered using the standard monthly calendar view that enables weeks and days to be selected and displayed. First enter the time and then select the day that you wish to be displayed.
- The interval option:
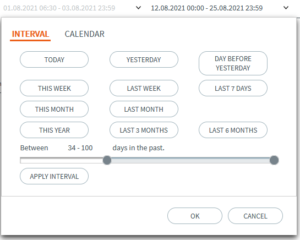
This enables the required interval of time to be selected and automatically defines the start and end date. A dynamic interval can be entered via suggestions or the slider. These intervals always refer to the current date.
The system parameters search.date.range.min and search.date.range.max can be used to set the maximum time period that can be defined using the sliders.
If a dynamic time interval is defined over the interval option, an icon ( ![]() ) will appear next to the time specification to indicate the dynamic nature.
) will appear next to the time specification to indicate the dynamic nature.