System
Inhalt/Content
System Settings
In the system settings, you make the global settings for various system functions and behaviour patterns. These general settings can be overridden in part by individual settings for users, groups, tenants, accounts and categories.
Agent tab
General

- Agent session timeout on idle [min]:
Inactive agents are logged out by the system after the time defined here. - Logoff agents on inactivity timeout:
- Auto switch template on recategorization:
Defines whether the response template is automatically changed when the agent carries out a recategorization. - Set ready state after Login for mail:
Determines whether the agent has the state Ready after login and receives mails. The state unknown means that the parameter was not previously set in the system configuration. - Set ready state after Login for chat:
Determines whether the agent is available for chats after login. The state unknown means that the parameter was not previously set in the system configuration. - Set ready state after Login for call:
Determines whether the agent is available for inbound calls after login. The state unknown means that the parameter was not previously set in the system configuration. - Use Web Agent profile cookies:
Personal settings of the agents (e.g. for display) can be saved via cookie.
Editor

- Allow change of reply-to address:
Allows the agent to set the response address manually when editing mails in the editor. This input field is hidden by default and can either be made visible on clicking on the CC label by the agent, or by setting the Display BCC address setting to Yes by the supervisor (see below).
 - Allow changes to template:
Allows the agent to select another response template. - Allow changes to CC addresses:
Set up for the agent to adjust the CC addresses of mails. - Display BCC addresses
The BCC address and the reply-to address selection are hidden in the editor by default. With this setting, it can be configured that these input fields will always be displayed. - Allow changes to BCC addresses:
Authorises the agent to edit the BCC addresses of mails. - Allow answering emails using HTML format:
Provides the agent with the right to use the HTML editor. - Auto switch to HTML edit mode:
Activates the automatic display of the HTML view of the response proposal in the response editor. For this it is necessary that the parameter Convert text mails for HTML templates is active. - Standard template for external forwarding:
Defines which template the system uses by default when an agent forwards a ticket externally and the use of the template is activated for the category or tenant of the ticket.
A specification in the category always overrides the specification on the tenant as well as the global specification. Even if you explicitly specify that no template is to be used for the category, this overrides any global specifications and specifications on the tenant, so that no template is used in this case.
A specification on the tenant always overrides the global specification. Even if you explicitly specify that no template is to be used for the category, this overrides any global specifications and specifications on the tenant, so that no template is used in this case.
Of course, you can also define individual templates for external forwarding.
For more information on configuring the standard template for the category or on the tenant, please contact your novomind project manager. - Standard template for external query:
Defines which template the system uses by default when an agent initiates an external query for a ticket and the use of the template is activated on the category or tenant of the ticket.
A specification in the category always overrides the specification on the tenant as well as the global specification. Even if you explicitly specify that no template is to be used for the category, this overrides any global specifications and specifications on the tenant, so that no template is used in this case.
A specification from the tenant always overrides the global specification. Even if you explicitly specify that no template is to be used for the category, this overrides any global specifications and specifications on the tenant, so that no template is used in this case.
Of course, you can also continue to define individual templates for external queries.
For more information on configuring the standard template for the category or on the tenant, please contact your novomind project manager.
Display

- Font to be used for plain text view:
Defines the font used to display the original mail and the reply mail in the information area. To select between Arial and Courier. - Display info tab:
Determines whether the tab Info is displayed in the novomind iAGENT Desk information area. - Indicate clearance authorization for current mail:
If a clearance check is required for the agent’s mails or the current category, you can activate the display of a corresponding warning at this point.
The state unknown means that the parameter was not previously set in the system configuration. - Show TOP text modules:
Defines whether the “TOP texts” text module group and the “TOP text modules” configuration menu are displayed in the novomind iAGENT Desk. - Auto switch to HTML view:
Mails with HTML format content are automatically displayed in the HTML view. - Colored category indicators:
The function provides colored highlighting of the recognized categories of the customer mail within the mail detail view. The highlighting can be toggled automatically or manually by the user. Please note that the function is only available for mails that have been received after activating the feature. - Default image for user:
Sets a default picture for all user profiles. The standard user picture is replaced by the upload of an individual picture in the respective profile. - Display mail property in folders: (since version 12.14)
Choosable Mail property which is displayed as an additional column in mailbox views - Label for mail property: (since version 12.14)
Display name for the additional mail property column (optional). If not set, the column will get the name of the mail property. If the values are available in multiple languages, the language in which they are to be displayed can additionally be set in the dropdown on the right.
Home area

- Display info tab in home area:
Activates the home area in the novomind iAGENT Desk (if configured). Using the house symbol in the WebAgent (top left), the agent can access an overview page with mail information, its agent settings and, if necessary, tenant-specific URLs (such as intranet pages or other pages and programs available via URL). - Show text modules in home area [days]:
Defines for how many days changed text modules are displayed in the home area. - Home info text:
You can enter an informative text here that is displayed in the home area
Retrieve

- Manual retrieval of postponed emails:
Select My reubmissions if the agent is only to be allowed to call re-submissions that it has set up itself. Select All resubmissions if you want the agent to be able to retrieve all re-submissions that exist in the system. - Manual retrieval of forwarded emails:
By selecting Individual mails only you specify that the agent can only retrieve mails that it has forwarded externally. With the setting All you allow the agent to retrieve all mails forwarded externally. - Change resubmit date in global resubmit folder:
Activating this Parameters allows agents to change the resubmit date in the global resubmit folder.
Spellcheck

- Auto correct permutations on spellcheck:
Automatically corrects or transposed characters in the framework of spell checking. - Spellcheck – Add:
Determines whether agents can add words to dictionaries during spell checking. If activated, new words are added directly to the active dictionary. If clearance is required, words added by the system during spell checking are collected in a separate dictionary that requires clearance by the supervisor. If this function is de-activated, words are generally not included in a dictionary during the spell check of mails or text modules (the “unknown” option is only displayed until a selection has been made for the first time).
Chat

- Delay for delayed quitting after sending [sec]:
A dropdown on the Send button can be used to automatically end the chat after the message is sent. Certain actions by the customer or agent can cause the automatic quitting to be cancelled (message sent or received; chat manually quitted; chat forwarded or resubmitted; chat rerouted after recategorization or tag change; agent who started automatic quitting was logged out) or the time to reset (agent or customer is typing). - Create ticket mode:
If activated, the agent can already create a ticket during the chat, to which certain properties from the chat are already transferred. If Post processing is chosen, the ticket can only be opened after the chat has ended. If the mode is disabled, the agent must switch to mail mode or open a completely new ticket via the central button bar at the top. - Create ticket template:
Here you can enter the name of a template that will be preselected for ticket creation. - Enable video blurring library:
If set to Yes, the area behind the agent is blurred in the video chat so that the background is no longer visible. - Video call background:
A system-wide background image can be set here which is displayed behind the agent during the video chat. The background image can then be activated by clicking on a button below the video preview.
Supervisor tab
Display
- Overview category-properties:
The listing of the configured categories in the supervisor can be extended by certain own settings of the categories. This is important, for example, if you have divided the various categories into 1st, 2nd and 3rd Leve categories via your own settings and also want to be able to search for these settings in the category list.
The correct syntax is: <category property> = <display name> (eg. refId=Reference number)
The input must be confirmed with [ENTER] and is then displayed in the form of a chip. - Display mail property in backlog: (since version 12.13)
Choosable Mail property which can be selected as an additional column to be displayed in the mail backlog - Label for mail property: (since version 12.13)
Display name for the additional mail property column (optional). If not set, the column will get the name of the mail property. If the values are available in multiple languages, the language in which they are to be displayed can additionally be set in the dropdown on the right. - Overview user-properties: User properties that should be selectable on the user overview page. Correct syntax is <user property> = <display name> (e.g. refId=Reference number).
Routing tab
General

- Service level based routing:
With service level based routing, tickets with a higher service level are delivered before tickets with a comparatively lower service level.

 This setting option is no longer available by default in new installations from version 11.0, since service level dependent routing is the default setting for routing in new installations from this point on. Please contact your novomind project leader for further information on this setting or the setting options in the interface.
 - Language-based routing:
The language-based routing distributes tickets based on the specified language skills of the agents. - Location-based routing:
The system automatically assigns tickets with location assignment to agents that are not or only assigned to this location. The location can be determined by the knowledge base, for example. - Tag-based routing:
The system automatically sends tickets with tags to matching agents who are assigned to all of this tags. - Time limit for agent’s inbox [min]:
If an agent does not reply to a mail within a given timeframe, no further mails will be sent to them until they have processed the pending mail. This ensures that agents do not ignore mails for an excessive period. If the time limit for a given mail has exceeded, this mail will turn red.
Privileged routing

When distributing new mails of a process (process-based routing) or of a sender (sender-based routing), the privileged routing prefers the agents that last processed a mail of this process/sender.
The process-based routing takes precedence over the sender-related routing: If the mail is assigned to a process, the system attempts to deliver it to the agent who processed the most recent mail in this process. If the mail is not assigned to an existing process, the system attempts to send the mail to the agent who processed the most recent mail from the same sender. If this does not work, e.g. because the agent is offline or on a break, the mail is delivered according to the other routing specifications.
The privileged routing is solved in such a way that the agent who has just processed a request of a contact (e.g. customer) is directly saved as the last agent on the contact.
This allows the system to check which agent was last in contact with this contact when a subsequent request is received. This agent is then provided as the first distribution target. This concept means that it does not matter through which channel the contact last enquired or currently inquires.
The privileged routing is activated/de-activated individually for each category: Under Master Data –> Categories. In the category configuration, click the tab Routing. It can be activated/deactivated through the checkbox Allow privileged routing.
- Ignore category on privileged routing:
If Privileged routing is active, the agent that processed a customer’s most recent ticket is the preferred recipient for new tickets from the same customer. This also applies if the ticket concerned belongs to a category that is not assigned to it. - Ignore location on privileged routing:
The routing prefers the agent who processed the most recent ticket of a customer, even if the ticket is assigned to a location to which the agent is not assigned. - Ignore language on privileged routing:
Routing gives preference to an agent who has processed the last ticket of a customer, even if the ticket is assigned to a language to which the agent is not assigned. - Ignore routing tags on privileged routing (only when iAGENT Call Module is activated):
Routing gives preference to an agent who has processed the last ticket of a customer, even if the ticket is assigned to routing tags to which the agent is not assigned.
Bundling

Bundling is a form of routing in which the system delivers all open mails of the same process/sender collectively to an agent. In this way, the agent can consistently answer related mails and redundant processing of the same issue is avoided.
The bundling can be activated/deactivated for each category individually through the checkbox “Allow bundling” on the Routing tab of the category edit dialogue.
The bundling does not necessarily search for the incoming email address, but uses it to find the assigned contact and distributes all open inquiries of the same contact to the same agent.
This behaviour is not active for defined mass-mailer addresses (System Settings -> Tab System).
- Ignore category on bundling:
As part of the bundling process, the agent receives tickets of all categories, regardless of which categories the agent is assigned to.
However, this does not apply to non-tenant tickets. - Ignore location on bundling:
When location-based routing is active, the agent receives all bundled tickets. Even those assigned to other locations. - Ignore language on bundling:
With active language-dependent routing the agent receives all bundled tickets, including tickets with a language to which the agent is not assigned. - Ignore routing tags on bundling:
With active tags-dependent routing the agent receives all bundled tickets, including those assigned to routing tags to which the agent is not assigned. - Mail bundling according to customer address:
Determines the maximum number of mails an agent can have per sender in the mailbox. Bundling is suspended when the maximum is reached. - Mail bundling according to process ID:
Defines the maximum number of mails an agent can have per operation in the mailbox. Bundling is suspended when the maximum is reached. - Event for email bundling:
Decides for which routing types bundling becomes active. If bundling applies to both manual and automatic routing, the above settings are applied to both types of routing.
Chat

- Language-based routing:
The language-dependent routing of distributed chats based on the specified language skills of the agent. - Reroute chat after recategorization (as of version 12.17):
Default setting to reroute a chat on the chat recategorization dialog in iAGENT Desk. If set to Yes, the checkmark on the recategorization dialog will be preset by default; if set to No, the checkmark has to be set manually if needed.
Service level tab
General

- Default service level [Hours]:
Applies to categories for which no individual service level is defined. - Service level forewarning [Percent]:
When the specified percentage of the service level is reached, the colour of the point before the value of the current service level changes from green to yellow: →
→ 
- Service Level according to business hours:
If you have configured business hours on your system, you can specify here whether the service level takes business hours into account. In this case, the service level will pause outside business hours.
The setting applies globally; it can be overridden individually for each tenant. - Automatic recategorization on exceeding of service level:
System-wide, it is determined whether tickets are automatically recategorized when the service level of the current category is exceeded. The settings for the recategorization are made for the individual categories. This feature represents a kind of “overflow function”. Temporary service level bottlenecks in a particular category can thus be resolved more quickly by increasing the number of case worker resources.
Reports
- Service level warning interval [Hours]:
The novomind iMAIL routing process regularly checks whether there is a service level warning for a category. If warnings exist, the system sends status mails to a specific email address in the defined interval (see below). - Service level report email address:
The destination address for the status mails mentioned above.
Business Hours
- Default Business Hours:
Select one of the existing business hours that you want to apply to the system.
The standard business hours can be customised to suit the tenant.
System tab
General

- Host name:
The name or IP address of the server on which your novomind iAGENT system is running. - Client port:
Communication interface between novomind iAGENT server and agents. - URL prefix:
A Tomcat application in whose environment the novomind iAGENT supervisor is running. - Start routing automatically:
Initiates routing at system start-up. - Date format:
several date and time formats can be selected from a dropdown list (dot delimiter, hyphen delimiter, slash delimiter etc.) The chosen format is used for all date and time specifications in your iAGENT instance. - Language:
The selected language is pre-set as the default language for the user interface. It can be changed individually for each user. - POP3 hostname:
The name or IP address of the POP3 server. - IMAP hostname:
The name or IP address of the IMAP server. - SMTP hostname:
The name or IP address of the SMTP server. - SMTP username (optional):
User name for SMTP access - SMTP password (optional)
Password for SMTP user - Incoming accounts
Activate/de-activate all incoming accounts. - Messenger incoming accounts
Activate/de-activate all messenger incoming accounts. - Send read statuses for messengers (since version 12.16)
Activates/Deactivates sending of read statuses for messengers. Customer messages within a chat are marked as read if either a) the messages are received while the agent has selected the chat and it is in chat mode, b) the messages are received while the agent was working on another chat and switches to this chat, c) the messages are received while the agent was in mail mode and the agent switches back to chat mode on this chat or d) a new message has been sent by the agent or bot.
The setting can also be made in the tenant settings and in the settings for the Messenger inbox accounts. A setting at the incoming accounts would would override the tenant setting and a tenant setting would override the global setting here. - Reply address for testing
It makes sense to use real customer emails during test operation in order to carry out authentic tests. To ensure that the mails remain in the test system and are never accidentally sent to customers under any circumstances, a test response address is defined and used for the entire test period. - Allow supervisors logins
Allows supervisors to log on to the system. - Allow agent logins
Allows agents to log on to the system.
Addresses

- Error email address:
If mails are received that cannot be processed, the system sends a corresponding notification mail to the address specified here. - Email address for critical system messages:
If a critical system error occurs, the system notifies the recipient stored at this point. - Email address for account polling error:
If an error occurs when retrieving a mail, it can happen that this mail blocks the in-box account and no more mails are received. In the event of such a query error, the system sends a notification email to the entered address. - Email address for tampered emails:
If the system registers a mail with manipulated information, it sends a warning mail to this address. - Please-do-not-reply-address:
If you are sending mails to which the recipient should not reply, use the address stored here as the sender address. - Default reply-to address:
Use this address as the sender address if you want the recipient to reply to a general address. If no address is entered at this point and in the configuration of the respective in-box account, the system sends responses to the processing agent. - Mass mailer address list:
Enter here email addresses or domains (as wildcard: “*@massenversand.com”) from which you receive mass mails.
Mails from these senders are not taken into account for the privileged routing or bundling of processes.
Archiving

- Mail archiving:
The selected option decides whether mails are archived in the database or on your file system. - Directory for mail archiving: (If you decide on File system , please specify the path where the system should store the archive files)
Please enter the complete path to the desired folder here. - Use compression for email archiving: (If you have decided on the database, please specify whether the system should compress and/or encrypt the data during archiving)
Compresses the data during archiving to minimize storage requirements.
 For new installations from version 11.0, data compression is activated by default for archiving.
 - Use encryption for email archiving:
Encrypts data during archiving to prevent unauthorised access.
Database

- JDBC-Driver-Class:
The name of the JDBC driver class used for the database connection. The driver class can, e.g. be included in the “nmIQMail.bat” query (for Windows servers) to start the novomind iAGENT process. - JDBC-Connect-URL:
The string for specification of the database connection. - Database username:
The user name for database access. - Database password:
The password for the database user. - Number of concurrent connections:
The maximum number of simultaneous database connections per process (supervisor or agent).
Security

- Required password strength for users:
In this dropdown you can define the required password strength for users on a scale from 0 (No restriction) to 4 (Very strong). The scale corresponds to the theoretical number of trials necessary to guess the password (irrespective of the amount of e. g. numbers or symbols in the chosen password). A password strength value of 0 corresponds to up to 10³ guesses, 1 corresponds to up to 106 guesses, 2 corresponds to up to 108 guesses, 3 corresponds to up to 1010 guesses and 4 corresponds to more than 1010 guesses. - Lock users on login faults:
If the number of failed attempts specified here is reached when trying to log on a user, the user is blocked.
To un-block the user, de-activate the checkbox Locked in its user profile. - Authentication type for users:
Defined how users authenticate: via the database, per IMAP or per LDAP. - Authentication type for agents:
Agents can authenticate via Database/IMAP or via LDAP/IMAP. - External Authentication (since Version 12.26)
Activates the external authentication in general - External Authentication for Supervisors (since Version 12.26)
Activates the external authentication for the iAGENT Supervisor - External Authentication for Agents (since Version 12.26)
Activates the external authentication for the iAGENT Desk - Show login Screen (since Version 12.26)
If single sign on (SSO) is activated, the login screen can be suppressed. - External Authentication-Method (since Version 12.26)
Different supported authentication methods can be selected. - …method-specific configuration fields… (since Version 12.26)
The description of the different fields will appear on clicking on the corresponding question mark. - REST API Cross-Origin Resource Sharing (CORS): (since version 12.15)
Enables Cross-Origin Resource Sharing (CORS) to allow browser-based access to the REST API from arbitrary hosts.
If you want users or agents to authenticate via LDAP, you must make the necessary entries. Set the authentication type to LDAP or LDAP/IMAP, save the setting and refresh the page using the ![]() -button. After the page has been re-loaded, navigate back to the System tab and scroll to Safety. The mask is now richer with a few more input fields:
-button. After the page has been re-loaded, navigate back to the System tab and scroll to Safety. The mask is now richer with a few more input fields:
- Active directory server address: The address of the active directory server
- Active directory domain: The domain of the active directory
- Active directory log: The log that uses the active directory – either LDAP or LDAPS can be selected.
- Active directory port: The port used
- LDAP username: The name of the LDAP user
- LDAP password: The password matching the above username
- LDAP cache timeout [Min]: The timeout for the LDAP cache, specified in minutes
- LDAP connect timeout [ms]: The timeout for the connection to the LDAP, specified in milliseconds
- User ID reverse lookup: Indicates whether the system performs a reverse lookup of the user ID
- Active directory agent group: (Only appears if LDAP is selected as authentication for agents)
- Active directory supervisor group: (Only appears if LDAP is selected as authentication for user)
- Create user profiles automatically: Determines whether the system creates user profiles automatically
Search

The search can be extended via custom defined fields (custom settings). For the defined search properties, entries are then displayed below the “More Filter” filter button to search exactly for entries with the desired property and its value. The syntax of how to fill the fields below is always as follows:
<name of custom setting>=<display name in search> (e.g. refId=reference number)
These fields appear in the individual searches and can be displayed as list columns for the search result as well.
- Full-text search: Full text search within mails and chats is enabled by default and can be disabled here.
- Searchable mail-properties: Mail properties (individual settings) entered here appear as a filter option under the item More filters in the search
- Searchable contact-properties: Contact properties (individual settings) entered here appear as a filter option under the item More filters in the search
- Searchable chat-properties: Chat properties (Chat-Infos) entered here appear as a filter option under the item More filters in the search
- Searchable contact-attributes: Contact attributes that should be selectable on the contact search.
Journey

This section has only one input line for entering so called Bundling properties, the syntax is “property name=display name”.
Useful values could include:
- Customer Status – e.g. regular customer, new customer, loyalty card owner, clicking Customer Status at a ticket with regular customer property lists all regular customer tickets
- CaseID – a special ID of a case, clicking Case lists all tickets with the same caseID
These entries as displayed as chips: Clicking the x-icon deletes the chip and the property. To save a property, you have to click the Save button at the upper edge of the page, entering the value won’t do.
After saving these chips in the image, every process (ticket) you open in the Backlog or in iAGENT Desk has the display names Case and Customer Status in a dropdownbox at its Journey tab. If values for caseID respectively cs were stored for your mail (CRM tab), clicking Case respectively Customer Status lists all processes with the same values.
Workflow tab
2nd-Level

- Send reminder messages on ext. inquiries after [hours]:
If no response is received to an external query within the specified time period, the system sends a one-time reminder mail. - Request disposition notification on external forward:
Requests acknowledgement of receipt from the recipient of an external query or external forwarding. The system recognises incoming acknowledgements of receipt of the “multi-part/report” content type and identifies them in the course of a mail. For external queries, acknowledgements of receipt are only flagged in the course if the agent does not select the option Complete operation nor the option Further processing. Whether the recipient sends an acknowledgement of receipt depends on their settings. - Reset state on receipt of external answer to:
Defines how external responses are processed.- Queued: the responses are transferred to the workflow and wait for processing just like other message receipts.
- Resubmit (explicit): The response mail is set immediately as a re-submission and assigned to the most recent agent (if available).
- Forward original customer mail externally:
Defines whether the customer mail is to be forwarded externally. The forwarded customer mail is attached.
This parameter applies to:- External forwardings performed manually by supervisors or agents
- Automatic forwardings defined for a category
- Forward template information externally:
If this function is active, the prepared response proposal is appended to the mail to be forwarded. This parameter applies to:- External forwardings performed manually by supervisors or agents
- Automatic forwardings that can be defined for a category.
- Allow override by user:
Allows the user to manually override the settings Forward priginal mail of the customer externally and Forward template information externally. In this case, the user can also decide whether to forward the customer mail or the response template as an attachment or as a mail. - Address input mode on external forward:
- Choice only: Agents can select the address for external forwarding from a selection list.
- Any desired: Agents may enter the address for an external forwarding manually.
Reply
- HTML-Template body style:
Defines a default style sheet for HTML templates. Adjustments in this area are directly visible in the HTML editor of the novomind iAGENT Desk.
The agent can override the respective setting in the editor with the appropriate system configuration. For more information on configuration, please contact your novomind project manager. - Send emails as Unicode message:
Allows agents to use any characters (e.g. not Western European characters) in response emails.
Confirmation
- Send confirmation emails:
If a corresponding template has been selected for the respective category, the system can send an acknowledgement of receipt. - Send confirmation to mass mailer addresses:
Here you can prevent the sending of acknowledgements of receipt to recognised mass mailing addresses.
Incoming actions

- Analyze text attachments:
Allows text attachments to be analysed by the knowledge base so that they can be considered for categorisation.
To do this, it is necessary to define an “ATTACHMENT” event in the knowledge base. If this event is not defined in the knowledge base, the mail is processed without analysis of the text attachments. For more information on the ATTACHMENT event, see the Composer manual. - Use CC addresses:
CC addresses of a customer mail are automatically included as CC addresses in the reply mail. - Copy TO recipients:
Addressees of a customer mail are automatically included as CC addresses in the reply mail. - Convert plain-text mails for HTML-Templates:
If both an HTML template and a text template exist for a category, this setting determines which template is used by the system.
Yes: The HTML template is used (provided one exists).
No: The template used depends on the format of the incoming mail. The HTML template is used for a mail in HTML format and the text template for a mail in plain text format. - Convert email character set to UTF-8:
Incoming emails are converted to the UTF-8 character set.
Duplicates
- Timeframe for customer doublet detection [days]:
Mails received within the specified time frame and from the same sender are recognised as customer duplicates and considered for the privileged routing. - Timeframe for content doublez detection [days]:
The content duplicate detection records mails with identical contents that were not registered by the duplicate detection due to a new message ID.
Mails with identical contents that were received within the time frame specified here are recognised and blocked by the system as content duplicates. Depending on the volume of mail, the system performance may be impaired by setting the time frame too high. We recommend a value of max. 3 days (usually 1 day should be sufficient).
Quality report
- Indicate quality check for current mail:
Activates the warning – quality control by supervisor below the Editor.
Resubmit

- Time limit for postponing/forwarding [hours]:
Limits the period that can be selected as waiting time for re-submissions or internal forwardings. Mails with an appropriate status that exceed the time period determined by the agent are re-integrated into the routing queue. - Default time interval for postponing [hours]:
The due date of the postponing operation is preselected automatically for the agent. The date and time is calculated by adding the specified amount of hours to the current time and rounding to the full hour. - Maximum number of postponements per agent:
Defines the maximum number of mails that can be re-submitted per agent. If no value is defined, the number is unlimited. - Time limit for non-specific postponing [hours]:
In principle it is not intended that agents temporarily postpone mails. This parameter prevents an unspecific re-submission mail from being re-submitted to the relevant agent within the specified time period.
In this case, the mail is either forwarded to another agent or, if no other suitable agent is available, is not returned to the original agent until after the expiry of the blocking period.
Forward
- Default time interval for forwarding [hours]:
The time limit for the forwarding operation is preselected automatically for the agent. The date and time is calculated by adding the specified amount of hours to the current time and rounding to the full hour.
Delivery failure
- Auto reactivate process in outbox on delivery failure:
In the event of delivery errors originating in the novomind iMAIL system, the corresponding operation that has already been sent and completed will be restored in the out-box with the status Delivery failed.
Only processes that have been completed are reactivated in the out-box. Delivery errors, e.g. queries, are not re-activated in the out-box, as these are still being processed.
The received delivery error mail is automatically completed but can be retrieved/viewed by the agent via the entry Delivery error in the course of the reply mail. It is irrelevant for the reactivation of an operation whether the delivery error was triggered by an on, CC or BCC address.
Causes for delivery errors can be, for example, an incorrect email address or a full customer mailbox. If the mail could not be delivered to several recipients, this may be noted in the delivery error mail (depending on the configuration of the mail server).
If a delivery error was caused by an incorrect recipient address, this TO, CC or BCC address can be corrected in the inbox of the novomind iAGENT Supervisor or Desk.
If this parameter is de-activated, incoming delivery errors appear as new processes in the in-box. Prerequisite for this function is the activation of the detection of delivery errors via the knowledge base. If the detection of delivery errors is not implemented in the knowledge base, this parameter has no effect. - Auto close unrecognized delivery failure messages:
Delivery failures not attributed to the novomind iMAIL system are completed immediately without a novomind iMAIL ticket being created or the mail archived.
Assign
- Assignment to foreign tenant: Defines whether operation IDs belonging to an external tenant can be used when assigning tickets to operations. If the function is de-activated and an external ID is still specified for the assignment, the system issues a corresponding error message.
The option Only visible allows the user to assign tickets from one tenant to transactions from other tenants that are visible to the user.
Non-tenant assignment is deactivated by default.
Tickets can be assigned to events in the novomind iAGENT supervisor backlog, in the global in-box and in the agent’s personal in-box in novomind iAGENT desk and in the search results of both applications (s. Mail view and manual routing).
System parameters tab
On the system parameter tab, the settings can be made via the interface which otherwise had to be set in the Routing.conf configuration file. These settings are not stored in the database but in the Routing.conf configuration file, which is read directly each time the editing interface is opened. This causes that these settings can be changed still over the configuration file directly, or even over the surface.
Since these settings must be made with special care, this tab is secured with a special right. Changing system parameters can lead to impairment or even failure of the iAGENT system if used improperly. For this reason, the possible parameters are not described here in the manual.
System Accounts
Using the System accounts mask, system accounts can be configured in the same way as the incoming accounts. These accounts are only used to receive responses to external inquiries and external forwarding.
The system accounts are retrieved from the core process and the custom protocols of the apps are available for them (e.g. EWS).
- The type is used to set which type of system account is to be created here. The following can be
selected:- Reply account: This type is used when the system account to be created is the account used to send replies from external forwards to the customer. The process of handling an external forwarding without completion is as follows:
- Agent forwards a mail via external forwarding without completion to an external contact (outside the iAGENT system).
- This contact answers the mail, and is offered the reply address as the receiving address in the reply -he should not change this!
- The reply enters the iAGENT system via the reply address, is analyzed and recognized there and then automatically forwarded directly to the end customer.
- This has the decisive advantage that the response of the external agent can be found in the iAGENT system, even though the agent actually responded “directly” to the customer. The agent can also use the 2nd-level folder to monitor whether the external contact has already replied and, if necessary, send them a reminder after a certain period of time.
- 2nd-Level-Reply: The type 2nd-Level-Reply is used when an agent sends a query as mail to an external contact (outside the iAGENT system) and the external contact responds. Then their answer is sent to this system account and forwarded to the agent as a reply. The external agent’s reply is also automatically saved as a note to the original request to which the query referred.
- Reply account: This type is used when the system account to be created is the account used to send replies from external forwards to the customer. The process of handling an external forwarding without completion is as follows:
- The name is free
- The email address is the address that will then be the reply or 2nd level reply address
- The channel is email by default and cannot be changed. However, it would be conceivable that apps bring along further channels of the type email, which can then be selected here
- Protocol is the protocol with which the mails are fetched from the mail server. Usually POP3 or IMAP, but there may be others depending on the installed apps.
- Weighting specifies the maximum number of messages fetched from this account in one step within a fetch cycle that runs across all system and inbox accounts. Default is 3 from each account.
- Tenant specifies the tenant to which this system account explicitly applies. This setting is not visible for the first two main accounts because they are general and thus apply to all tenants unless they have defined their own additional system accounts.
Incoming accounts
Incoming accounts are all accounts through which novomind iAGENT receives messages. The administration interface for your incoming accounts can be found under Administration –> System –> Incoming accounts.
List view
The list view under Administration –> System –> Incoming accounts takes some basic information from all existing accounts:
- Status: The status of the account is displayed using traffic light colours:
- • The account is active.
- • A warning has been issued.
- • The account is currently not working. The reason may be that the account or the core process is disabled or the inbound accounts have been disabled via System Settings –> System –> Incoming Accounts. More detailed status information is available by mouse-over over the colour point.
- Active: Indicates whether the account is activated.
- Name: The name of the account
- Channel: The channel through which new queries enter the account
- Protocol: The log used to receive the data
- Tenant: The Tenant to which the incoming account is assigned
- Email address: The email address of this incoming account
- Incoming: The count of mails still waiting on the mailserver for being picked up by the iAGENT Server.
- Use: The overall count of mails went into this incoming account since activation of this incoming account
The list of incoming accounts can be sorted using the individual column headers. Click on a column header and the list is sorted according to this criterion in alphabetical order. Click on it again and the list is sorted in reverse alphabetical order.
To filter certain entries from the list, use the Filter button. In the columns Status and Active, you can filter according to the pre-defined options using the drop-down menu. In the columns Name, Channel, Protocol and Tenant, you can search for specific entries. Searching starts with the first letter entered and presents a list of all results that match the input. Each additional letter refines the search result.
To remove an incoming account from the list, select it by clicking the corresponding checkbox. This activates the Delete button. Click on it and the inbox account will be removed.
If deleted incoming accounts exist, the New button gets a dropdown feature.
Click on the arrow to obtain the option Restore. Clicking on Restore opens a dialog menu with all deleted incoming accounts. Select the in-box incoming account/accounts which you want to restore – use the search box to quickly access the in-box account for longer lists. As soon as you have selected a deleted incoming account, the Restore button is active. Click on it and the account will return to the list view of the in-box accounts.
Click on an entry from the list to edit its configuration.
General tab
- Name: The name of the incoming account. This is a free name that is independent from the POP3/IMAP account name
- Email address: Send the email address to the messages for this account.
- Channel: The input channel through which messages from this account are received. Possible channels are:
- Letter
- Fax
- SMS
- Social media
- Protocol: Depending on the input channel, messages with different logs can be received:
- POP3
- POP3S
- IMAP
- IMAPS
- Further, proprietary formats can be added individually by app developers.
- Exposure (incoming/outgoing): Defines the maximum number of messages retrieved during a routing cycle. The default setting for this parameter is set in the system configuration. You can obtain more information on this from your novomind project manager.
- Tenant: Displays to which tenant the incoming account belongs. If the account is not assigned to a tenant, this is displayed by the specification All and the account is visible for all agents.
- Outgoing account: Selects the account to be preset by the system for the response. The response account can differ from the incoming account.
- Reply to address: Defines the primary response address for the account. The system uses this address by default if none of the alternative reply addresses have been selected (see next entry).
- Alternative reply to addresses: Lists alternative reply addresses of the account. The agent can select these response addresses as an alternative to the default response address for this account.
- Disallow answer: Activate this checkbox if the messages received via this account are to be read but not responded to.
- Index documents for full-text search: You can index for the full text search the content of all messages received via this account and/or all responses of the agents to incoming messages in this account by activating the respective checkboxes.
Fax tab
If you select Fax as channel for an in-box account, the configuration mask is extended by the tab Fax :
Fill in the following fields with the corresponding data:
- Gateway domain: Domain of the fax gateway
- Prefix: Character string placed before the recipient call number
- Postfix: Character string to be placed after the recipient call number
Click on Save Button to save the settings.
Tab for selected protocol
Depending on the associated protocol of the incoming account, another tab with the name of the protocol will appear in the incoming account dialogue. Channel specific information will be editable on this tab. For POP3 or IMAP a further tab SMTP will be shown.
Passwords may have a maximum length of 24 characters. Some special characters (such as §) are not allowed in the password.
On the SMTP tab, an extended SMTP-Logging may be activated. This setting leads to further logging information in the account specific logfile (outgoing.<ID>.log): The SMTP Server IP, the queue ID of the sent mail and the response of the first SMTP Server will be logged additionally. These details will also be saved on the sent mails as X-HEADER which makes analysis of unsuccessful deliveries much easier.
Individual settings tab
The Individual settings tab is initially not assigned. You can configure numerous individual properties for the incoming account by input of specific keys.
To do this, click the New button. In the dialog box that appears, enter the required key and the corresponding value.
Click on OK and then on Save Button
For more information on the available keys and settings, please contact your novomind project leader.
Click on the column Value of an existing key in order to edit it.
You will delete a particular key by selecting the corresponding checkbox of the key. This activates the Delete button. Click on it and the key will be removed from the list.
Messenger Incoming Accounts
List View
Displays the Messenger inbox accounts defined in the system with their current status. Requests coming into the system via messenger inbox accounts are delivered to agents in the form of chats.
Above the list there are buttons to create new messenger inbox accounts, delete or enable/disable them.
General Tab
Basic information about the messenger input account.
- ID: assigned by the system
- Name: Freely assignable
- Protocol: The protocol to be used for the inbox account. The protocols displayed here come from the installed novomind messaging apps. These can be WhatsApp, Facebook or Google’s Business Messages, among others.
- Channel: The channel under which incoming chats are managed in novomind iAGENT. This is determined by the selected protocol.
- Tenant: The tenant to whom this incoming account belongs.
- Category: Category to which all incoming messages via this Messenger inbox account are assigned.
- Laguage: Default language to be assigned to incoming chats. Available are the same languages as for the language skills in the Users settings.
Automatic Responses Tab
Automatic reply to the last customer message after elapsed time.
Here automatic messages can be sent to customers whose incoming messages have not been answered by an agent after a certain time.
This is practical, for example, if messengers have a time-limited response (Facebook/WhatsApp messages must be answered within 24h) – here, an automatic message can be sent to the customer shortly before the time limit expires, in which they are asked to confirm briefly with “Yes” that their request is still current. This way the 24h limit starts from the beginning and the entire history so far is presented to the agent when processing the last message.
- Send automatic reply: Activates the automatic reply
- Auto reply: The text that will be sent with the auto reply.
- Send auto reply after: Time after message receipt after which the automatic reply will be sent.
- Close chat: Should the chat be closed after the automatic reply and thus no more distribution attempts to agents take place?
Automatic response to the last customer message in case it was sent out of business hours
Automatic messages can be sent to customers automatically if they write outside business hours. Then the customer knows right away that they do not have to expect an immediate reply.
- Send automatic reply: Activates the automatic reply
- Automatic reply: The text that will be sent with the automatic reply.
- Close chat afterwards: Should the chat be closed after the automatic reply and thus no more distribution attempts to agents take place?
Integration of a novomind iAGENT Help chatbot
For Messenger, it is possible to integrate an iAGENT Help Chatbot as the first response instance. If a customer writes to this Messenger inbox account, the request is first forwarded to the chatbot via iAGENT and its response is sent back to the customer. The ongoing chatbot dialog with the customer is visible in the chat backlog. If the chatbot gets stuck, it is able to hand over the chat to an agent along with the dialog that has been conducted so far, or queue the chat for distribution.
Here you can set which chatbot should respond (since version 12.19). The chatbots are configured under Administration -> Chat –> Chatbots.
-
- Chatbot:
- Disabled
In this case no chatbot will be integrated. - Chatbot of category
In this case it depends on the category of the incoming chat. The chatbot that is selected for the corresponding category in the category settings (Routing tab) will respond. If no chatbot is selected there, no chatbot is integrated. - Selected chatbot
Here you can select a specific chatbot to be inegrated for this Messenger inbox account via dropdown.
- Disabled
- Chatbot:
Apps
With the novomind iAGENT apps, you can customise the functional scope of your system and adapt novomind iAGENT for your workflows. You can install the apps from the ever-growing App Store or develop your own features.
![]() Our customers benefit from the ideas of the novomind iAGENT customer network by developing their own apps and publishing them in the App Store. Please understand that the documentation may be incomplete with regard to externally developed apps.
Our customers benefit from the ideas of the novomind iAGENT customer network by developing their own apps and publishing them in the App Store. Please understand that the documentation may be incomplete with regard to externally developed apps.
Installed Apps tab
Navigate to the main menu on the System – Apps. In the tab >Installed Apps , you will find a list of apps that are additionally installed on your system.
If an update is available for an app, you will see a button that can be used to update the corresponding app directly (since version 12.13).
To uninstall an app, select the corresponding checkbox. This activates the button Deinstall. Click on it and the selected app will be removed from your system.
App Store tab
If you want to install additional apps, you can find them in the tab App Store.
To install your own app, first upload it using the Upload button. The app is automatically installed and activated after uploading.
OAuth2 Applications
The OAuth2 protocol (version 2.0) provides other applications with secure authentication, e.g. for accessing internal system data.
List
In the list view, you can see all applications entered.
Columns:
- Name:
The name of the OAuth2-Application entry (free name) - Client-ID:
The Client-ID is needed to request a token from an external application through OAuth2 - Redirect-URLs:
The redirect URLs of this entry
To enter a new application, click on the [NEW] button. If you want to edit one of the list entries, click on the respective entry.
Edit dialogue
- Name:
The name of the OAuth2-Application entry (free name) - Description:
A free description for the supervisors to be able to see, for which external application this entry is for - Client-ID:
The free text “Client-ID” is needed to request a token from an external application through OAuth2. - Secret:
The secret is an equivalent to a password for this OAuth2 Application entry and has to be used to authenticate an application on the iAGENT System in combination with the Client-ID above. - Show Secret:
If you have to look for the current secret, you may make the secret visible by pressing this button. - New Secret:
It is possible to create a new, random Client Secret by pressing the “New secret” button. If you want to - Redirect-URLs:
After the external application authorized on the iAGENT system through Client-ID and Secret, the user will be redirected to the given URLs with the generated token in the URL. After that, the external application is able to use an iAGENT user (with the flag “Agent”) and the token to use the iAGENT REST API in the context of the user (for more information about the REST API see https://apps.novomind.com/developer/iagent/rest/overview.html). You may add more than one Redirect-URLs, just in case the system is call either by http or by https.
The changes have to be saved through the Save button afterwards.
Work break reasons
Work break reasons reasons can be configured, which will appear in the iAGENT Desk application on the begin of any break, as soon as at least one work break reason is configured and activated. These work break reasons are configurable for any tenant.
On the work break reason itself is a parameter called “work time break” which defines whether the break is a payed one or not. Examples for unpayed breaks are lunch breaks – payed breaks could be a meeting.
In the case that a call comes in while the employee is just chosing a work break reason on the break dialogue, the dialogue disappears because the selection of the work break reason counts as work time and is not already part of the break.
The used work break reasons can be reported through the report wizard’s new view “BREAK_HISTORY”.
Telephone System Plugins
Only if the novomind iAGENT Call module has been activated, this menu appears to configure the connection to the phone system.
List view
List
The list shows the following columns, by which the entries may be filtered (filter button on the righthand side):
- Status:
Shows the status of the entry by colours:- • Red = deactivated
- • Yellow = activated, but an error has occured
- • Green = activated and running
- Active:
Shows whether this entry has manually been activated - Name:
Name of the entry - Type:
Shows the type of the Call connector. Several Apps may bring several different Call connectors to be chosen from here. - Functions:
Shows the functions of the call connector - Tenants:
One or more tenants may be associated with the entries. They will be shown comma separated.
After entering a new search criteria, the search will be executed automatically. The list may be re-sorted by clicking the corresponding header afterwards.
The leading checkboxes mark the entries for executing any functions through the buttons above the list (select all through the checkbox in the header).
If a plugin has an error while connecting and its status icon is yellow, the respective error message can be inspected via mouseover on the status or error icon.
General Tab
For every phone system connection, an entry has to be created. It contains the selected connector app below others.
Data fields:
- Type:
The selected call connector (braught into the system through an app) - Name:
The free text name of the entry
Tenants Tab
For the tenant separation it is necessary that one or more tenants will be associated.
The list may be pre-filtered by the following options:
- All:
All existing tenants - Assigned entries:
Only already assigned tenants will be shown (intial setting) - Unassigned entries:
Only entries will be shown that are not associated to this entry currently.
After the accociation has been changed through checking / unchecking the checkboxes, these changes have to be saved through the save button above.
Call Connector Tab
This tab is app-specific. Every Call app may bring different configuration data to this dialogue. The shown example is for the novomind iAGENT Call Connector App.
The Call Connector app consists of two components:
- The Call-Connector-App, which will be uploaded into the novomind iAGENT Supervisor application
- The Call Connector, an external app that will be installed “near” to the phone system
Connection
- Port: Port, through which the iAGENT Supervisor Routing and the Call connector communicate
- Actual call connector: Shows the connection string to the call connector
- Hostname: Hostname of the machine where the Call Connector is installed on
- Public hostname: The public hostname of the iAGENT System (may be pipelined through a Site2Site connection)
- Public port: The port that will be used to communicate through the public hostname and the connector
Upload Call-Flow
- Call-Flow file: The call flow file which contains a java script definition of the IVR flow (.zip)
Category
- Default category: Category which will be set on all calls that don’t pass the IVR through this telephone system plugins entry
Click-To-Call
- Active: Choose whether the recognition and highlighting of phone numbers (Click-to-Call) should be enabled or disabled.
- Default Regioncode: Regioncode used for detection of phone numbers in mails and notes. If no Default Regioncode is chosen, the user’s language will be used for number detection.
Softphone Settings
- Softphone URL: The URL to the softphone frontend, which will be injected into an iframe in the agent application
- Softphone auto logon: When an agent logs into iAGENT Desk with a device ID, they will also be logged into the phone system as well.
Individual Settings Tab
Initially the Individual Settings Tab is empty. By entering user specific key-value-pairs you can configure arbitrary individual settings.
Controls:
- +New: use this Button to create a new key and a list of possible values
- Delete: ticked lines of keys and their values will be deleted upon entering this button. There is no “Are you sure?” confirmation.
After entering new keys and values, click SAVE to apply your changes.
Tenants
novomind iAGENT is multi-tenant capable, so that you can integrate any number of tenants on a central server system with a comprehensive roles and rights concept.
In the main menu under Administration –> System –> Tenants all tenants created in the system are listed with names and an optional short description.
List view
By clicking the column titles Name or Description sort the corresponding column in alphabetical order. A second click on the column header sorts the column in reverse order.
Click on the Filter button to activate the search fields of the columns. Type a search term in one of the fields if you want to quickly find a specific entry from an extensive list. Searching starts with the first letter entered and presents a list of all results that match the input. Each additional letter refines the search result.
Click on an entry from the list to edit its configuration.
If you want to delete one or more tenants, select their checkbox(es). Then click on the Delete Button.
Create a new tenant by clicking on New Button. Edit its properties as described in the following chapters.
Multitenancy: Incoming accounts separated by tenants
As of iAGENT Version >= 11.32, the supervisor will only see the incoming accounts that either have no tenant assignment or that belong to a tenant of the logged on supervisor. Supervisors who are not assigned to a tenant themselves can also only view / edit incoming accounts without tenant assignment. When creating incoming accounts, only the “own” tenants are offered for selection.
Special exception: If no system group has been assigned to a tenant yet, then all supervisors are offered to use this tenant on creating incoming accounts.
All supervisors can see these accounts in the list of accounts until a system group is assigned to the new tenant.
General tab
In the General tab, you can edit the name and the Description of the tenants. You accept your changes by clicking on the button Save. To delete the tenant, click on the Delete button and confirm the subsequent security query.
Settings tab
- Use CC addresses:
Specifies whether the system automatically copies the CC addresses of the original mail as CC addresses for this tenant into the reply mail.
The setting on the tenant overwrites the global setting of this parameter (see chapter Workflow tab). - Allow changes to CC addresses:
Determines whether the CC addresses may be edited in response mails of this tenant.
The setting on the tenant overwrites the global setting of this parameter (see chapter Agent tab). - Copy TO recipients:
Determines whether multiple addressees in the “To” field of the incoming mail are automatically transferred to the CC field of the response.
The setting on the tenant overwrites the global setting of this parameter (see chapter Workflow tab). - Default time interval for postponing [hours]:
Preselects the due date of the postponing operation automatically for the agent. The date and time is calculated by adding the specified amount of hours to the current time and rounding to the full hour.
The setting on the tenant overwrites the global setting of this parameter (see chapter Workflow tab). - Default time interval for forwarding [hours]:
Preselects the time limit for the forwarding operation automatically for the agent. The date and time is calculated by adding the specified amount of hours to the current time and rounding to the full hour.
The setting on the tenant overwrites the global setting of this parameter (see chapter Workflow tab). - Spellcheck – Add:
Determines whether agents can add words to dictionaries during spell checking. If activated, new words are added directly to the active dictionary. If clearance is required, words added by the system during spell checking are collected in a separate dictionary that requires clearance by the supervisor. If this function is disabled, words are generally not included in a dictionary during the spell check of mails or text modules.
The setting on the tenant overwrites the global setting of this parameter (see chapter Agent tab). - Default Service level:
Sets a general service level for all categories of the tenant. This setting is overwritten by a category-specific setting. - Priority / Maximum: (until iAGENT Version 12.26)
Defines a general value for priority of all categories of the tenant and the maximum number of messages that the system distributes to agents per category during a routing cycle. Both values can also be set individually on a category itself. The individually set value of a category overwrites the value set on the tenant. - Send read statuses for messengers (as of version 12.16):
Activates/Deactivates sending of read statuses for messengers. Customer messages within a chat are marked as read if either a) the messages are received while the agent has selected the chat and it is in chat mode, b) the messages are received while the agent was working on another chat and switches to this chat, c) the messages are received while the agent was in mail mode and the agent switches back to chat mode on this chat or d) a new message has been sent by the agent or bot.
The setting can also be made globally and in the settings for the Messenger incoming accounts. Settings at the incoming accounts would would override the tenant settings and tenant settings would override global settings. - HOME URL:
The URL for the tenant’s home area in the novomind iAGENT Desk. The home area is an additional feature that requires separate enabling.
Please contact your novomind project manager if you are interested. - Home info text:
The info text for the home area of the tenant. - Channel:
By activating the checkboxes provided, you define which channels can be used for the tenant. - Video call background:
Sets a tenant-specific background image which is displayed behind the agent in the video chat. The background image can then be activated by clicking on a button below the video preview.
The setting on the tenant overwrites the global setting of this parameter (see chapter Agent tab).
Account Settings tab
- Please-do-not-reply-address:
The email address used as the sender address for responses to which the customer should not reply. - IMAP hostname:
The name of the IMAP server. - POP3 hostname:
The name of the POP3 server.
Individual Settings tab
The Individual settings tab is empty initially. You can configure numerous individual properties for the tenant by entering specific keys.
To do this, click the +New button. In the dialog box that appears, enter the required key and the corresponding value. Click on OK and then save your changes with the Save button above of the main tenants screen.
You may delete a particular key by selecting the corresponding checkbox of the key and clicking the Delete button.
For more information on the available keys and settings, please contact your novomind project manager.
SMTP Configuration
The SMTP configuration can be defined at tenant level. This means that an individual SMTP configuration can be created for every tenant.
These settings at tenant level are the fallback for the SMTP settings of the inbound mail accounts. Which SMTP settings is used as a fallback at tenant level for which incoming account is defined via the tenant allocation in the configuration of the inbound accounts.
If no (valid) SMTP setting is available either in an incoming account or at tenant level, the global setting will be used.
The following PROPERTIES are supported:
- smtp.host
- smtp.user
- smtp.password
- smtp.port
- smtp.useSSL [true|false]
- smtp.useStartTLS [true|false]
- smtp.isStartTLSRequired [true|false]
- smtp.connectionTimeout (in ms)
- smtp.ioTimeout (in ms)
Next, the entered settings are copied by means of “Save changes“. Entered settings can be deleted again by clicking the icon on the right, next to the input fields.
The incoming account’s SMTP host configuration uses the tenant SMTP host configuration as a fall-back. Only after that will the global SMTP host configuration be used.
Tenant specific error messages
The Error email address can be defined for each tenant individually from the default setting (see Configuration –> Address Settings).
When the inbound mail account is assigned to a tenant, then the tenant’s setting is considered first. The address is also regarded within the template in a tenant-specific manner (template tags <ERROR_ADDRESS>).
This tenant specific address can be created in the Configuration menu – Edit tenants on the Individual Settings tab.
After selecting the desired tenant and clicking on the New button, the input fields appear in which the PROPERTY (the name of the parameter) and the VALUE (the desired mail) are entered.
The following parameters must be entered for the addresses:
- Error email address -> errorAddress
The entry then has to be applied by clicking Save settings or by pressing ENTER. Pre-selected entries can be deleted through the corresponding Delete Button.
Tenant specific service level warning
The Service level report email address can be set differently to the standard setting (see Administration –>System –>System Settings and then Service Level –>Reports) for each tenant. This means individual target addresses for the Service-Level-Warn-Mail can be defined individually for each tenant. Only tickets from the respective tenant categories will then be taken into consideration in these mails.
The setting can be adjusted via the parameter “serviceLevel.warning.address”. Its value is set to the desired recipient address.
The addresses entered in the tenants’s individual settings will be taken into consideration first. Only if no addresses are set here, the addresses under “Administration->System->System Settings” and then “Service Level->Reports” will be taken into consideration.
Addresses set in a tenants’s “Individual Settings” will be considered first. Only in case no address has been specified there will the addresses under “Administration->System->System Settings” and then “Service Level->Reports” will be considered.
Tenant specific templates for new processes
You can define tenant-specific templates for new processes. For this purpose, create the property “newProcess.quickCase.template“ with the value “Template-Name.txt“.
![]() The system does not validate whether “Template-Name.txt“ actually exists or not.
The system does not validate whether “Template-Name.txt“ actually exists or not.
Create the template if it does not exist yet.
Main Categories
Main Categories are useful to structurize your global inbox in the novomind iAGENT Supervisor application or for easier reporting of tickets to specific category groups.
Each main category can only be associated to one system group.
Because of this, main categories associations will be derived up in the group hierarchy so that the supervisor above the current system group can also see this main category in the report selection or the global inbox.
When a category is assigned to a main category, but the supervisor user is not associated to the systemgroup the main category is assigned to, the category will appear as unassigned category in the global inbox.
List
The list shows the following columns. A filter for each column can be activated through the filter button on the right-hand side:
- Display name
The name of the main category - System group
The associated system group - Assigned categories
The categories that are assigned to this main group. If there are more than
After selecting or entering a search criterion, the search will be started immediately.
Afterwards, the list may be re-sorted through a click on the header. A following click on the currently sorted header switches the sorting direction of this column.
Through the preceding checkboxes, multiple entries may be selected to be processed altogether. Buttons appear disabled when their functionality is not implemented / does not make sense for multiple selected entries.
The checkbox in the header selects all displayed entries at once.
A click on an entry opens the edit dialogue.
Main category
General tab
On the general tab, the following information can be seen/edit:
- Display name
The name of the main category - System group
The associated system group - Group members
The supervisors that are associated to the selected system group. This list shall only increase the transparency and thus is not editable! Changes in the user associations must be made on the group itself!
Categories tab
On this tab, the categories can be associated to this main category.
The list entries may be pre-filtered through the filter drop-down list:
- All:
All categories, independent from the current assignment to this main category - Unassigned entries:
Only the categories that are currently not assigned to the main category are shown - Assigned entries:
Only the categories that are currently assigned to the main category are shown
Beside of that, a free text search is offered. The search is a blurred search, means that the search finds all categories that contain the entered search phrase somewhere in the name.
After changing the association through the checkboxes, the changes have to be saved through the Save button at the top of the dialogue.
Reporting Templates
Several default reporting templates are delivered with the novomind iAGENT Software. You can find them in this section.
Beside of that, you may generate custom reports or ask novomind to create a special report for you – which also will be uploaded here.
List
The list can be filtered through the following criteria – as long as the filters are activated (see filter button on the right hand side above the list):
- Name
Name of the Reporting template - UID
System wide unique name of this reporting template - File
Filename of the excel file, which is contained in the uploaded zip file (Reportdefinition) - Updated
Last update/upload date of the report - Owner
The user who uploaded the report - Generated report
Information whether this reporting template has been created through the Reportgenerator or not
After selecting or entering a search criterion, the search will be started immediately.
Afterwards, the list may be re-sorted through a click on the header. A following click on the currently sorted header switches the sorting direction of this column.
Through the preceding checkboxes, multiple entries may be selected to be processed altogether. Buttons appear disabled when their functionality is not implemented / does not make sense for multiple selected entries.
The checkbox in the header selects all displayed entries at once.
A click on an entry opens the edit dialogue.
Edit Button
The edit button is only active when a single reporting template has been selected, which has been generated through the reportgenerator before (see column “Generated Report”).![]() Once a generated report has been downloaded, changed manually and uploaded again, this is not longer considered as a generated report and thus cannot be edited through the report generator any more.
Once a generated report has been downloaded, changed manually and uploaded again, this is not longer considered as a generated report and thus cannot be edited through the report generator any more.
A click on this button opens the reportgenerator, where the reporting template can be changed.
Upload button
A click on the upload button opens a dialogue, on which you may chose one or more reporting templates in zip file format.
Note that it is necessary to set the checkmark “overwrite existing templates” when you want to upload a new version of an existing reporting template to avoid accidentally overwriting of reporting templates that may not be undone any more.
An advantage of overwriting an existing reporting template against deleting the old and creating a new one is that all the settings like group associations for execution privileges and saved reporting filters will not be lost!
Download button
Opens a file save dialogue, where you may select a download folder or change the target filename of the selected reporting template in zip file format. The button is only activated when only one reporting template is selected in the list.
Reporting Template
General tab
This tab shows the following information about the reporting template – this view is read only.
- Name
Name of the Reporting template. - UID
System wide unique name of this reporting template - File
Filename of the excel file, which is contained in the uploaded zip file (Reportdefinition) - Updated
Last update/upload date of the report - Owner
The user who uploaded the report
Groups tab
A reporting template is only visible for the one who uploaded it and for users of the assigned supervisor groups. The association can be fulfilled on this tab.
The list entries may be pre-filtered through the filter drop-down list:
- All:
All system groups, the supervisor is privileged to see, independent from the current assignment to this reporting template - Unassigned entries:
Only the system groups that are currently not assigned to the reporting template are shown - Assigned entries:
Only the system groups that are currently assigned to the reporting template are shown
Beside of that, a free text search is offered. The search is a blurred search, means that the search finds all system groups that contain the entered search phrase somewhere in the name.
Example: Search input “is” –> system group “Supervisor” will also be found
After changing the association through the checkboxes, the changes have to be saved through the Save button at the top of the dialogue. Now, all supervisors of the associated groups are able to see and execute this reporting template.
![]() To assign the privileges to execute this reporting template is also possible through the Group administration.
To assign the privileges to execute this reporting template is also possible through the Group administration.
Control Panel
This function has not yet been adapted for the new user interface for the Supervisor. Instead, the mask of the old user interface is included.
On the control panel dialogue, objects (categories, incoming accounts, agents, etc.) can be assigned, created, changed or deleted.
Needed privileges
There are privileges available in the Group rights administration menu for the configuration of the control panel “Control Panel – Display” and “Control Panel – Administration” (Rights menu “Configuration”).
“Control Panel – Display” needs to be activated before the menu item “Control Panel” is visible in the “Configuration” menu.
Structure of the control panel
After accessing the menu item, supervisors can see all objects in the Control Panel that they (subject to their hierarchy level and user rights) are allowed to view. Since administrators are at the top of the hierarchy, they are able to see all objects. If supervisors/administrators have administrative rights for the respective objects, they can access the configuration forms of an individual object directly via the Control Panel and make changes.
The right “Control Panel – Administration” makes it possible to assign objects directly in the Control Panel via “drag and drop”. Changes made via “drag and drop” and deleted assignments are saved automatically (message “Changes saved” in the respective tab). The following actions are available in the administration mode:
- Copying objects:
When copying objects, the existing allocation of objects is extended by additional allocations. Several objects can be selected by holding down the “Ctrl” key. In order to copy the selected objects, the “Ctrl” key must be held down throughout the “drag and drop” process. Copying does not work for incoming accounts and categories, as these can only be assigned to a single tenant (incoming accounts) and/or a single group (category). When copying, a little tool tip showing the objects to be copied, appears. - Moving objects:
Moving objects replaces the existing assignment of objects with a new one.
By holding down the “Ctrl” key, several objects can be selected and moved at the same time. They are moved using a “drag and drop” process (without the “Ctrl” key) and is symbolized by the a little tool tip that contains the names of all objects to be moved. - Deleting assignments:
This action only deletes the assignment of objects, not the objects themselves. To delete, the relevant objects are selected (it is possible to make multiple selections by holding down the “Ctrl” key) and then the “Delete” button is clicked on in the menu bar (the button “Delete” appears only after at least one object has been selected).
The Control Panel has three views:
- System View,
- Agent View
- and Category View.
A tenant filter is available, too. Tenant filter settings are saved individually for each user.
In general, objects have the following characteristics in the views:
- Graphical objects:
Objects with an assignment that can be modified in the control panel are graphically displayed. Graphics are explained in the individual views. - Quantity graphics:
For a better overview, a quantity graphic is used for representation when there are over 25 objects in an assignment. Clicking on the graphic itself or the three dots next to the graphic will expand it. - Tooltips:
All symbols come with a tooltip - Deep linking:
If the user has the necessary rights, clicking on an object gains them access to the edit mode of the respective object type. For graphical objects, double-clicking will access the relevant edit mode; the edit modes of all other objects are accessed with a single click. - Sorting:
Objects can be sorted (within their assignment) by clicking on the column header - Totals:
The total number of objects is shown for areas with several objects
The upper sections of the views show the existing assignments. The lower section shows all currently unassigned objects. The following rules apply to this area in all three views:
- The section consists of the sub-sections “All” and “Unassigned”. “All” is an overview of all objects that a user (subject to hierarchy level and user rights) is entitled to view. “Unassigned” is a subgroup of “All” and contains all unassigned objects.
- Objects in the sub-section “All” can only be copied and objects in the “Unassigned” sub-section can only be moved.
- Assigning objects to area with a quantity graphic is not possible. In these cases, the quantity graphic must first be expanded.
Only the graphics and functions described above are used in this section.
Upon accessing the Control Panel, the “Menu” button appears in the main button bar. Clicking on this button hides the left-hand menu to get more space for viewing the configuration.
When the menu is hidden, the button “Menu” is marked orange.
System View tab
After clicking on the funnel symbol, a pull-down menu to select the tenant appears. Clicking on “All” makes the funnel symbol re-appear and closes the pull-down menu.
The following assignments can be carried out in the system view:
- Incoming account to tenant (by moving only)
- Supervisor to system group (by copying and moving)
- Visible category to system group (by copying and moving)
The system view contains the following columns:
- Tenant:
Shows the tenants assigned to the groups of which the logged in supervisor/administrator is a member. - Incoming account:
Shows the incoming accounts assigned to the tenant. Symbols: (active account, deactivated account, quantity graphic). - System group:
Groups to which the logged in supervisor/administrator is assigned. A possible hierarchical structure of the groups is not shown here. - Supervisor:
Shows supervisors assigned to the respective system group. Symbols: (logged in SV, not logged in SV, quantity graphic). - Visible categories:
Shows categories assigned to the respective system group as “Visible categories”. Symbols: (visible category, quantity graphic) or “All” for all categories.
The following actions are possible in the lower section of the system view:
- Copying supervisors or agents from the “All” area to a system group. The object section of the system view also shows agents because they can become supervisors/administrators if they are assigned to a system group. A quantity graphic cannot be selected here in order to prevent the simultaneous assignment of all agents and supervisors to a system group.
- Moving supervisors and agents from the section “Unassigned” to a system group. The same rules as for copying supervisors and agents apply.
- Copying visible categories from the section “All” in a system group. Copying a quantity graphic is possible in this case. Prerequisites: The respective tenant must be assigned to at least one system group, and no visible categories must be assigned to the system group.
- Moving visible categories from the section “Unassigned” to a system group. It is irrelevant whether categories have been assigned to the system group. Moving a quantity graphic is possible in this case. Prerequisites: The respective tenant must be assigned to at least one system group, and no visible categories need to be assigned to the system group.
Agent View tab
The agent view shows all agent-specific dependencies.
The following assignments can be carried out in the agent view: Agents to groups (copying and moving) Categories to groups (moving only).
The agent view contains the following columns:
- Tenant:
View the tenants assigned to the system groups of the logged in supervisors/administrators. - Group:
Agent groups that the logged in supervisor/administrator is allowed to view - Agent:
Agents assigned to the agent groups Symbols: (logged in agent, logged out agent, quantity graphic) - Category:
Categories that are processed by the agent group. Symbols: (category, quantity graphic) or “All” for all categories
The following actions are possible in the lower section of the agent view:
- Copying of agents from the section “All” in an agent group. In order to copy a quantity graphic, there has to be at least one agent group to which no agents have been assigned.
- Moving agents from the area “Unassigned: to an agent group
- Copying categories from the section “All” to an agent group. Since one category can only be assigned to exactly one group, only unassigned categories can be copied.
- Moving categories from the section “Unassigned” to an agent group. It is irrelevant whether categories have been assigned to the agent group. Moving a quantity graphic is possible in this case. Prerequisites: The respective agent group must not be assigned any categories.
The load of the Agent groups is displayed with a yellow bar in the Agent view. This is designed to provide the supervisor with an additional control instrument to be able to detect current group loads quickly and take appropriate countermeasures.
The extent of the load – and consequently the size of the bar – is determined by the number of open mails in the respective Agent group. The group with the highest number of open mails is considered as working to 100% capacity and has a completely filled-in yellow bar as a result. The bars of the other groups display the relative load compared to the 100%.
If the mouse is moved to a bar, the corresponding number values are displayed as tooltip.
The values are to be interpreted as follows:
- First number: Count of open mails in the corresponding group
- Second number: Count of mails that are in the group with the most open mails
- Third number: Percentage from the first against the second number. Count of open mails against count of open mails in the group with the most open mails (rounded).
In addition, the tooltip provides information about the significance of the column when you move the mouse to the column header.
Category View tab
The category view contains all category-related assignments.
The following assignments can be carried out in the category view:
- Text module groups to categories (by copying and moving)
- Templates to categories (by copying and moving)
- Addresses to categories (by copying and moving)
- Transaction codes to categories (by copying and moving)
The category view is divided into the following columns:
- Category:
Shows categories that are assigned to the logged in supervisor/administrator as “Visible categories”. - Text module groups:
Shows only the text module groups of the 1st hierarchy level because only these can be assigned a category. Symbols: (visible text module groups, invisible text module groups, quantity graphic) - Template – edit:
Accesses template editing for this category Symbol: (edit template) - Template – Category assignment :
Shows templates that agents who are allowed to process this category have as alternatives Symbols: (template, quantity graphic) - Address book:
Shows addresses available for this category Symbols: (Address, quantity graphic ) - Transaction code:
Shows transaction codes available in this category Symbols: (Transaction code, quantity graphic)
The following actions are possible in the lower section of the category view:
- Copying text module groups from the section “All” in a category. A quantity graphic can only be copied into a category where no text module groups have been assigned.
- Moving text module groups from the section “Unassigned” to an agent group.
- Copying templates from the section “All” into a category. A quantity graphic can only be copied into a category where no templates have been assigned.
- Moving templates from the section “Unassigned” into a category. A quantity graphic can only be copied into a category where no other templates have been assigned.
- Copying addresses from the section “All” into an address book. A quantity graphic can only be copied into a category where no addresses have been assigned.
- Moving addresses into a category from the “Unassigned” section. A quantity graphic can only be copied into a category where no addresses have been assigned.
- Copying transaction codes from the section “Unassigned” into a category. A quantity graphic can only be copied into a category where no addresses have been assigned.
- Moving transaction codes from the section “Unassigned” into a category. A quantity graphic can only be copied into a category where no other transaction codes have been assigned.
Editing objects via deep linking: After accessing the edit mode of an object, the button “Back” appears in the menu bar. To switch back to the Control Panel view, always use the “Back” button.
![]() After switching back to the control panel, changes made in the edit mode will only become visible after refreshing the view (click the Refresh button in the menu bar).
After switching back to the control panel, changes made in the edit mode will only become visible after refreshing the view (click the Refresh button in the menu bar).
Logging
On this dialogue, logging levels for several application topics can be defined.
The log level corresponds to the grade of detail as follows:
- ERROR:
Only real application errors (Exceptions) will be logged.
Example: The text that shall be saved into a database column, is too long for the column. - WARN:
Everything that could lead to program errors and thus is handled by fallback settings.
Example: The select case does not handle the given value and switches to the default behavior. - INFO
All the information about the system that could be of any interest.
Example: Information about used JDK version on service start - DEBUG
Brings out information about debug information to debug some specific issues. Usually this logs more than needed in usual conditions.
Example: Values of several variables on specific moments - TRACE
Lays a trace of breadcrumbs – when has a method been entered, when was it left, which direction did the program take… Generates tons of logfiles. - ALL
Everything that can be logged in any way. Generates tons of logfiles. - OFF
So the level of logging will increase from the top to the bottom.
The loglevels derive the settings from all entries above -> INFO contains WARN and ERROR but no DEBUG information
Runtime configuration Log Level tab
The loglevels of several Java classes can be defined on this tab.
The settings are only transient (in the memory) and will be lost on the next service restart!
List
The list shows the following columns that also can be used for filtering – when the filter mode is activated (button on the right-hand side):
- Logger:
Name of the logger that gives information about its origin. Usually it represents a Java classnamme whose properties and events will be logged correspondingly - Log-Level:
The detail grade of the entries that will be logged (see previous section). - Process:
iAGENT processes that use this logger.
After selecting or entering a search criterion, the search will be started immediately. The list may be re-sorted through a click on the header, afterwards. A following click on the currently sorted header switches the sorting direction of this column.
The changed loglevels will be saved after clicking the Save button on top of the dialogue.
Permanent configuration of keys tab
The loglevels of several application topics and the database loglevel can be defined on this tab. The settings of this loggers will permanently be saved in the system and will be applied even after a system restart!
The database loglevel is the first setting above the list.
List
The list shows the following columns that also can be used for filtering – when the filter mode is activated (button on the right-hand side):
- Key:
Name of the key that gives information about its origin process / program part. Usually, keys are built featurebased – so their name contains the feature like chat, routing, channels… - Log-Level:
The detail grade of the entries that will be logged (see previous section).
After selecting or entering a search criterion, the search will be started immediately. The list may be re-sorted through a click on the header, afterwards. A following click on the currently sorted header switches the sorting direction of this column.
The changed loglevels will be saved after clicking the Save button on top of the dialogue.
Download Log-file tab
The logfiles, resulting of the settings on the tab Permanent configuration of keys, can be downloaded through this dialogue.
All available logfiles (corresponding to the permanently configured loggers) appear in the dropdown list. Their names correspond to a part of the logger names (Logfile: chat.routing.log and corresponding logger log.level.routing.chat).
A click on the Download button opens a file save dialogue.
Show Log-File tab
The logfiles, resulting of the settings on the tab Permanent configuration of keys, can be displayed on this dialogue.
All available logfiles (corresponding to the permanently configured loggers) appear in the dropdown list. Their names correspond to a part of the logger names (Logfile: chat.routing.log and corresponding logger log.level.routing.chat).
A click on the Show Log-File button shows the last 500 lines of the selected logfile in the big text field below the button. If you need more than 500 Lines, please download the complete logfile through the tab Download Log-File instead.
Archive tab (as of version 12.17)
Older log files, resulting of the settings on the tab Permanent configuration of keys, can be downloaded here from the past in compressed form (*.zip).
In the first selection list the name of the logfile is selected. Their names correspond to a part of the logger names (Logfile: chat.routing.log and corresponding logger log.level.routing.chat).
The second dropdown opens a dialog to select any time window from which the log files should be downloaded. Under the Interval tab, a dynamic interval which always refers to the current date is entered via the suggestions or the slider. In this case, an icon appears next to the time entry (![]() ), indicating the dynamic. Under Calendar, a time frame with fixed dates can be defined.
), indicating the dynamic. Under Calendar, a time frame with fixed dates can be defined.
After selecting a logfile and a time frame, a list with the compressed log files in the selected time fram (one file per day) appears after clicking the Search button. These can then be saved individually via the Download button.
Status
This dialogue contains important information about your system configuration, performance and usage.
Info Tab
The Info Tab shows the following system information:
- novomind iAGENT Version
- novomind iAGENT build date
- Java provider
- Java Version
- Java Mail API Version
- Database Provider
- Database JDBC Version
- Operating System
- Default Locale
- Default Timezone
- Software installation date
System Parameters Tab
Displays the following information:
- Process ID
- Memory usage
- Maximum memory
- Free memory
- Number of CPUs
- Current number of threads
- Max. Number of Threads (Peak) – What is the maximum number of threads used simultaneously since the last iAGENT service start?
- Worker Threads (Number)
- Total number of started threads – Shows the total number of started threads – even if they have been terminated in the meantime.
- Number of objects in the cache – master data + transaction data
- Maximum number of mails in the backlog – Shows the maximum number of mails that can be in the backlog. When this limit is reached, the fetching of new mails is stopped until some mails have been processed and thus the backlog has become smaller.
- Maximum backlog size – shows the limit in megabytes that the backlog can accept. If this limit is reached, the fetching of new mails is stopped until some mails have been processed and thus the backlog has become smaller.
- System last started on – The last iAGENT service restart.
Processes Tab
Displays the iAGENT “Core” and “Desk” processes with their status.
- iAGENT Core processes:
- Status (green/red) – is the process running?
- Process id
- Accounts (Active) – shows the number of active inbox accounts that are queried recurrently by the Core service for new mails.
- Account or log errors – shows the number of errors that occurred while retrieving the inbound accounts.
- iAGENT Desk processes
- Status (green/red) – is the process running?
- Client ID – unique process ID of the desk process (important in case of several desk processes running in parallel)
- IP address of the server on which the desk process is running
- Agents online – number of agents logged on this iAGENT Desk node. In case of multiple desk processes, the agents can be divided among the different processes.
Database Statistics Tab
Shows information about the database
- DB pool size (workflow): Maximum number of connections for critical operations (e.g. workflow).
- DB Pool Size (Reports): Maximum number of connections exclusively for reports.
- DB pool size (Call): Maximum number of connections exclusively for calls.
- SQL Timeout (Worklow) [sec]: The database timeout for SQL executions from the workflow area in seconds.
- SQL Timeout (Reports) [sec]: The database timeout for SQL executions from the Reports section in seconds
- SQL Timeout (Call) [sec]: The database timeout for SQL executions from the Call area in seconds.
- Active connections. The number of active connections to the database from iAGENT.
- Read – Average duration of a typical, frequently used read access in routing in milliseconds. This should be in the single digit ms range.
- Write – Average duration of a typical, frequently used write access in routing in milliseconds. This should be well below 50ms.
- Sequence – Average duration of determining the next free number from sequences required for routing. Values in the range of up to 20ms are considered acceptable.
- Average Wait Time – The average wait time per database access to a free database connection (see DB Pool Limit).
- Total number of waits – The number of database accesses that had to wait for a free database connection (see DB Pool Limit).
Cache Statistics Tab
Overview of number and type of master data entities and transaction data entities including their storage
API Statistics Tab
Shows information about used Public API. This page can be used to detect bottlenecks that can lead to performance impairments in the iAGENT system.
The table displays all uses of the iAGENT Java APIs. The values displayed in the table have tooltips that show the Java package path (if applicable).
Table columns:
- API name (+tooltip): the name of the extensionpoint that was used. If an extension point of the private API was used that is deprecated, it will be shown crossed out as an indication that something urgently needs to be changed here.
- API function: The name of the function that was used.
- Plugin (+Tooltip): Class in the app that uses this extensionpoint.
- Count: Number of function calls this app has made since activation or last iAGENT service restart.
- Duration (max.): Maximum duration of one of these function calls in milliseconds. Colors red if a tooltip with the stack trace of the function call is available for better analysis.
- Duration (average): Shows the average duration of these function calls by this app. The background colors of the column are automatically adjusted: Green if the recommended value per function call / extension point (see tooltip) was not exceeded. Yellow if this value has been exceeded but has not yet doubled in duration. Red if the the recommended value has doubled.
- App: The icon of the app that triggered this line.
Queues Tab
Overview of utilization, delays, blockades etc. of the internal event queues
Features Tab
The following functions are supported on this dialog:
- Reset text module statistics:
The frequency of using the text modules is counted in a statistic (“Administration” -> “Answers” -> “Text modules”). This button can be used to reset the statistics. - Update templates:
Changes to templates at the file level are applied to the supervisor (the view in the “Templates” menu is updated) and transferred to the novomind iAGENT Desk. - Reset database statistics:
Resets the statistics displayed on the “Database Statistics” tab to 0 and starts determining the average values again. This should be used when configurations have been made that are hoped to improve access times. - Update knowledge base:
After making changes to the iAGENT knowledge base directly on the file system of the iAGENT web server, the most current knowledge base can be activated from this button. This will discard the template versions cached for all supervisors that have not yet been saved to the server with Apply Changes. - Reset API statistics:
Resets the statistics displayed on the “API Statistics” tab to 0 and starts determining the average and maximum values again. This should be used when changes have been made to apps that are hoped to improve access times. - Trigger GC manually
Java is designed to determine on its own at times that objects in memory are no longer needed and then clears them. This process can also be triggered manually using this button. The result can then be checked on the “System parameters” tab (e.g. value at “Number of objects in cache”). - Send message to agents
Opens a dialog for entering an individual message that will be sent to all logged-in agents without reply option. Well suited if an unplanned system restart has to be performed – so that the agents still have the opportunity to save their work states and log off in a controlled manner. - Trigger thread dump
For some analyses it is helpful to provide a thread dump. This can be generated via the button. The resulting file is then available on the web server file system.
License Status Tab
Shows information about the current iAGENT license as well as relevant usage statistics in this context.
- Owner: The license owner registered on the license.
- Your license is valid until: Expiration date of the license. Shortly before this date occurs, a corresponding hint message will be displayed after logging into the Supervisor. The license must be replaced with a new one before it expires. If your system is operated as Software as a Service (SaaS), the operator of the system will take care of this.
- Your license allows: Maximum number of received requests per month. After reaching this limit, fetching new request from the configured inbound accounts will be stopped. The fetching will then resume only in the next month.
- Your license allows: Maximum number of agents logged into the system at the same time. If this value is reached, no further login by agents will be accepted and the login will be rejected. Login is then only possible after prior logout of logged in agents.
- Maximum number of simultaneously logged in agents today: Statistical value about the maximum number of simultaneously logged in agents on the day today as of 0:00.
- Maximum number of concurrently logged in agents last 7 days: Statistical value about the maximum number of concurrently logged in agents within the last 7 days (from today 00:00 o’clock 7 days into the past).
- Maximum number of concurrently logged in agents last month: Statistical value about the maximum number of concurrently logged in agents within the last month (from today 00:00 30 days in the past)
- Maximum number of concurrently logged in agents last 3 months: Statistical value about the maximum number of concurrently logged in agents within the last 3 months (from today 00:00 o’clock 90 days in the past)
Data deletion
The integrated data deletion function can be used to delete specific customer requests (chat, phone call and mail modules). To be able to use this functionality, the supervisor must be assigned the “CleanArchive-display” right via their groups. The deletion log is then located on the web server and can be viewed via the supervisor menu item Administration –> System –> Logging log file routing.cleanarchive.log.
Internal system rules for deletion
Data deletion is based on saved searches. For this purpose, a search run is performed in the Advanced search in the Supervisor and saved as a favorite (via the Save as button). The search then appears under My Favorites. When deleting data in the Execution tab, this favorite is selected in the dropdown under Saved Search. The further settings for data deletion then refer to the results of this search.
![]()
You can also use the search tab to delete e.g. individual transactions. To do this, go to Advanced Search and select the search results to be deleted via checkbox. This activates a drop-down menu at the top right above the search results at Actions. Clicking on Data deletion saves the selected entries as a search and transfers it to the data deletion area.
Deletion is based on transactions, i.e. calls are only deleted
- if they do not belong to processes that still contain open calls
- if all requests of the connected process have also been selected for cleanup in the same deletion run.
- if the call itself has been closed or answered.
- phone calls must be finished before they can be deleted; as sometimes calls are not finished correctly can be deleted after 24 hours.
So for requests belonging to a process, make sure that all requests of the process are deleted with the same delete run configuration! Otherwise all inquiries of the incompletely closed process remain.
The system prevents the deletion of individual tickets from a process so that the process is not incomplete and the entire clarification process for this process can no longer be traced.
One time execution
The mask is structured a little bit different than known from the Supervisor because deletion runs should be able to be executed directly, i.e. without having to save them beforehand. Therefore, when you enter the dialog, you start on the execution tab, where you can configure your “onetime” deletion run and execute it directly.
Scheduled recurring execution
If, on the other hand, you want to set up a recurring deletion run, you have to switch directly to the Task Planning tab and use the New button to create a new deletion run configuration.
The Execution tab is the same in both dialogs, so it is only described once here.
Execution tab
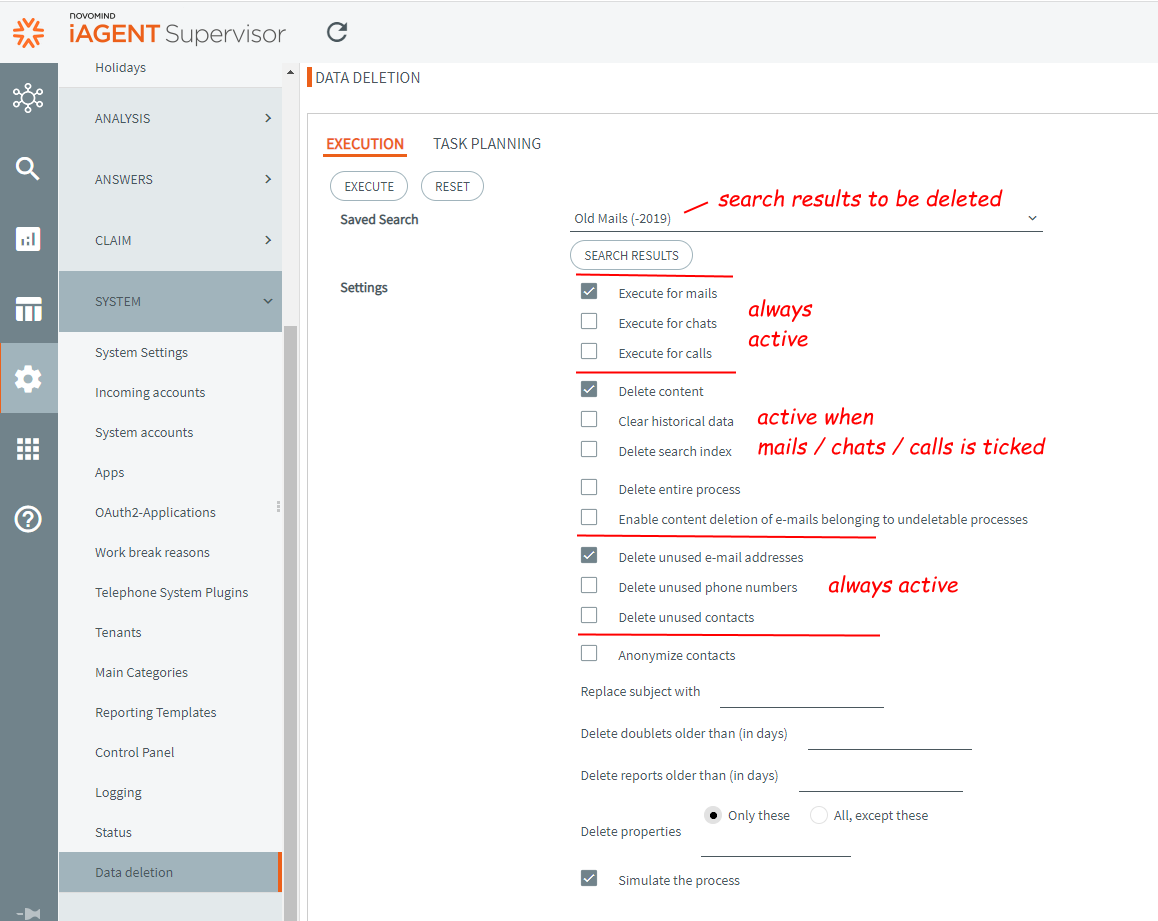
- Execute button – Executes the delete operations defined below. Is enabled only if the configuration is suitable for execution, i.e. either mails or chats with at least one content type (content, history data, or search index) are to be deleted.
- Reset button – resets all fields of the input mask to the initial state. There will be no confirmation prompt.
- Saved search – Displays all saved search favorites visible to the logged-in supervisor, which werepreviously saved via the detailed search or transferred to this supervisor via user rights. The saved searches are executed in the rights context of the user who originally saved this search! So if the saved search belongs to another user, their username will be displayed in brackets after the search name.
- Search results button – If a saved search is selected that was also created by the currently logged-in supervisor, this button can be used to open the search in a new window for checking the resulting entries.
If the search was saved by another user and shared only with the supervisor, this button remains disabled because the delete run executes the search in the context of the original user and it could be that the supervisor can thus see data that they is not actually allowed to see - Settings
- Execute for chats – Executes the selected saved search and takes the found chats into account.
- Execute for calls – Executes the selected saved search and takes the found calls into account.
- Thus, if calls are to be deleted from the delete run, this option must be enabled.
- It may happen that not all requests found by the search are actually deleted. For example, one-way tickets will not be deleted if there is still an open ticket in their process or simply if the status of the ticket itself is still open.
- Delete content – if active, deletes the mails themselves in case of queries from the Mail module – and the individual chat messages in case of chats, the assigned phone tickets in case of calls. The additionally saved metadata such as date of receipt, email addresses, subject (for mails), category, etc. or the whole reporting capability will be preserved.
- Delete historical data – deletes – if active – the metadata such as date of receipt, email addresses, category etc. as well as the search index and the contents. Mail contents and thus the full text search index cannot exist without the metadata.
- Delete search index – deletes – if active – all mail contents from the full text search.
- Delete entire process – If activated, this will also delete further individual tickets of tickets to be deleted that belong to a task, even though they may not have been found by the search selected on the delete run. Thus, the number of deleted tickets can increase against the number of hits from the search.
- Enable content deletion of emails belonging to undeletable processes – This option can be used to control deleting the contents of emails that belong to a task that is not fully completed. This option can be enabled only if at least the “Execute for mails” and only the “Delete contents” options are selected.
- Delete unused email addresses – Causes a check to be made across all mails after the delete run to see if email address entries exist that are no longer referenced by any request. These will then be deleted.
- Delete unused phone numbers – deletes phone numbers orphaned by call deletion.
- Delete unused contacts – Causes a check to be made after the deletion run across all mails as to whether contacts exist that are no longer referenced by any request. These will then be deleted.
- Delete unused messenger identifiers – A unique messenger identifier is assigned to each messenger message input. This is effectively the “Messenger phone number” that is stored on the connected account. If, as a result of a chat delete run, no more chats exist that reference this Messenger Identifier, then this Messenger Identifier is deleted and thus detached from the contact.
- Delete unused Messenger dialogs – Incoming Messenger messages are saved as chats and are all assigned to the same Messenger dialog per sender. So there is one messenger dialog per sender that contains all chats of this sender. This allows scrolling up in a Messenger chat to view older chats from the same sender. If all of a customer’s chats were deleted during a chat delete run, no chat will reference their Messenger dialog anymore, which will then be deleted if this option is enabled.
- Anonymize contacts – Deletes the connection between the contact and the request, preventing association between the contact and the process. This option can only be activated if Delete content is activated and “Clear historical data” is not activated. If the option Delete unused contacts is also selected, the data of these contacts will also be deleted as soon as no process refers to them anymore.
- Delete notes – Deletes the notes that were created for processes. Can only be activated if Delete content is activated and Delete historical data is not activated.
- Replace subject with – This option allows the subject of mails to be overwritten with a fixed value and thus made anonymous.
- Delete duplicates older than (in days ) – Deletes duplicates sorted out on receipt that the agents do not even see. For revision reasons, they are kept until they are deleted using this option. The age in days determines up to how many days newly received duplicates are kept.
- Delete reports from age (in days ) – Deletes transmission reports that remain on the system for revision reasons. The age in days determines up to how many days newly received transmission reports will be kept.
- Delete properties – This option can be used to delete specific chat and mail properties. This is only possible if either “Execute for mails” or “Execute for chats” is set and “Delete history data” is not set. The properties are entered with their name and ENTER in the input field. After each ENTER, a “chip” is visually displayed for this, which can also be deleted again using “x” or the DELETE key on the keyboard.
- Only this : Deletes the chat and mail properties specified in the input option below from entries found via the selected saved search.
- All, except these – deletes all properties except the chat and mail properties specified in the option below.
- Simulate operation – executes the configured deletion run in a simulation. Results are stored in the log file. If this option is active, no data will be deleted!
Task planning tab
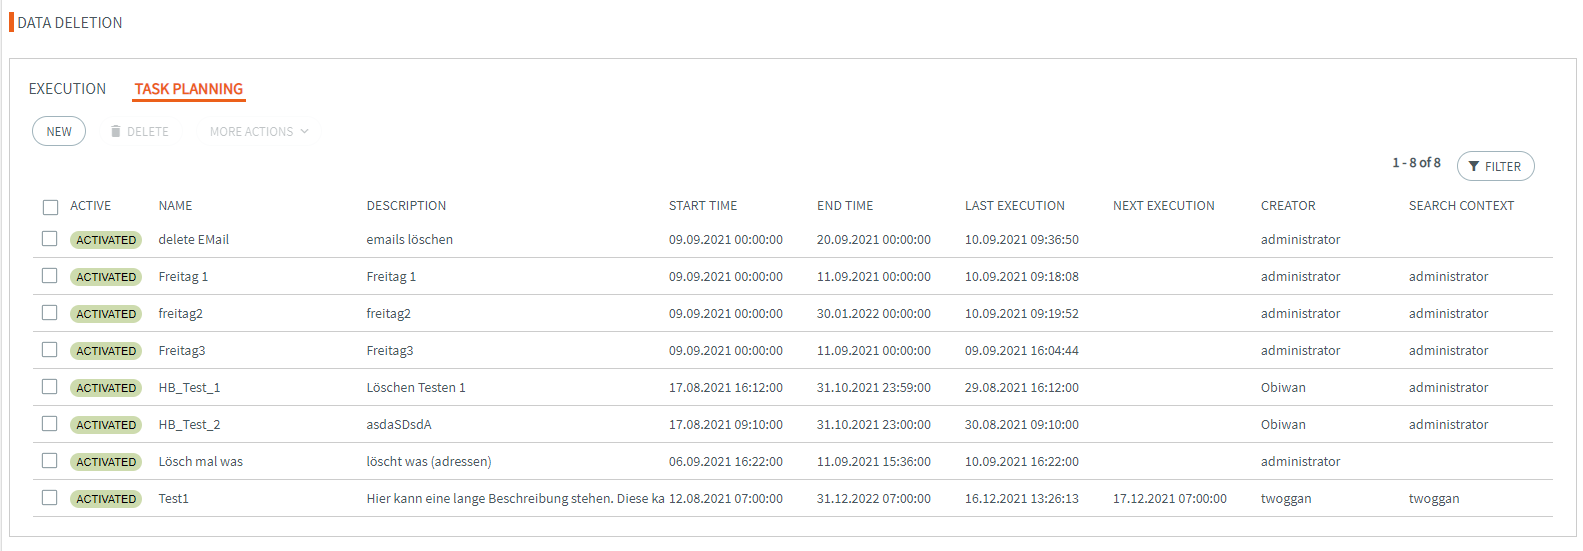
On the Task Planning tab, all scheduled deletion runs are clearly displayed in a list with a lot of helpful
information.
These would be:
Active – Status display whether this delete run is deactivated, activated, scheduled (start date still in the
future) or expired (end date is in the past).
Name – the short name of the deletion run, limited to 128 characters.
Description – the detailed description of the deletion run
Start time – the start time for this delete run entered when creating the run
End time – the optional end time for this delete run entered when creating the execution
Last execution – The timestamp of the last execution (start of the execution)
Next execution – the time of the next execution calculated on the basis of the start date and interval
Creator – user who configured this deletion run.
Search context – user under whose user permissions the search filter specified on the delete run is
executed.
Buttons above the list
New – Opens the dialog for creating a new deletion run to be scheduled.
Delete – Deletes the selected deletion run(s).
More actions – Activate / Deactivate. Activates or deactivates the marked deletion runs so that they are automatically executed by the system on the server when they are due. The activation state is prominently displayed in the list.
General tab
This tab is visible when an existing deletion run is opened from the task scheduler or a new deletion run is to be created for the task scheduler.
- ID – system-wide unique number of this deletion run. It is assigned automatically when creating a new run and cannot be changed.
- Created – the creation date of this deletion run. The user name of the user who created this deletion run is displayed in brackets after it.
- Modified – The last modification date of this deletion run. The username of the user who modified this delete run is displayed in parentheses after it.
- Last run – Shows when the run was last started.
- Next run – the time of the next run calculated from the start date and interval
- Search context – User name of the user under whose user permissions the search filter specified on the delete run is executed.
- Name – Freely definable name up to 128 characters, under which this delete run can also be found in the task scheduling list.
- Description – a description that should explain what the delete run does and for what reason.
Planning tab
- Start time – Specifies the time from which this run should be executed automatically. If this time is in the past and the deletion run is activated through the task scheduling list, the first execution is made up and the run is executed immediately.
- End date (optional) – Specifies until when this deletion run should be executed automatically at the specified interval. The end date is optional and can therefore be left blank. This will also cause the run to
be executed over and over again until it is manually deactivated. - Execution – interval at which the run should be executed. Depending on the selection, the detail fields below will also change to precisely limit the execution:
- If Daily is selected:
- Interval (in days ) – Here you can enter the daily interval at which the run is to be executed. Example: A “2” causes an execution every second day.
- If Weekly is selected:
- Interval (in weeks ) – Here you can enter the weekly interval at which the run should be executed. Example: A 2 causes an execution every 2 weeks.
- Day of week – Here you can enter all weekdays on which the run will be executed at weekly intervals. Example: A 2 in the Time interval (in weeks) field and set check marks at “Monday” and “Wednesday” causes the run to run every two weeks on Monday and Wednesday.
- If Monthly is selected:
- Interval (in months ) – Here you can enter in which monthly interval the run should be executed. Example: A 2 causes an execution every 2 months.
- Type of execution
- On specific day of the month – here it is possible to specify a day. Thus, a 31 causes an execution every month on the 31st of the month. If the month does not have 31 days, the run will be executed on the last day of the month.
- On a certain day of the week – specifies on which day of the week in the new month the run should be executed. Example: The “First Thursday” setting starts the run on the first Thursday of every x-th month (see “Interval in months” setting).
- If Yearly is selected:
- Interval (in years ) – Here you can enter in which yearly interval the run should be executed. Example: A 2 causes an execution every 2 years.
- Type of execution
- On specific day of the year – here it is possible to specify the day and month in further input fields. Thus, it can be specified that the run is always executed, for example, exactly on July 25 of the year.
- Day of the month – the day on which the run will be executed in the additionally entered month of the year.
- Month – the month in which the run will be executed in the given year.
- On specific day of the week in the month – With this option it is possible to start the run e.g. on every second Wednesday in August.
- Weekday – Here it is possible to set on which weekday of which week of the month the run should be started. Example: Last Tuesday – the run will be started exactly on the last Tuesday in the due month.
- Month – Determines in which month the run should be executed.
- If Daily is selected:
Log Tab (since version 12.21)
A new tag Log allows to view the so far executed data deletion jobs. You can select the job you wish to view from a dropdown list and find all the details described below.
It is possible to drop all existing Log entries using the delete button.
![]() Delete all existing log entries (with confirmation prompt)
Delete all existing log entries (with confirmation prompt)
![]() Select the deletion run
Select the deletion run
- ID: ID of the deletion run
- Start date: Start of execution of the deletion run
- End date: End of execution of the deletion run
- Single ticket: Number of deleted individual tickets
- Contacts: Number of deleted contacts
- Emails: Number of deleted mails
- Messenger identifiers: Number of deleted Messenger contact options
Deletion failed due to:
- Active Calls / Mails in Process / Mails in Queue / Mail in Table Entry: Number with status not completed, respectively
- Mails in Unclosed Status: Number of processes with an open ticket
- Mail IDs:
System Warnings
Sometimes, the system announces some errors that are displayed on the top right corner of the iAGENT Supervisor header beside the log off button.
These could be:
- CTI Error: The connection to the PBX system was interrupted. Please check the Phone System Plugins and the status of the PBX.
- Runtime Error: This error occurs when an automatic processing on a category has failed (autmatic-closing or -forwarding failed due to any reason).
System Logs and Mails
Indicators for bad system performance or special circumstances are logged and sometimes, an automated information mail will be sent to the corresponding configured email address.
Fail point limit exceeded:
This information announces that specific system actions took longer as expected. It is not necessary to take immediate action. However, if this message comes regularly, the system should be examined for vulnerabilities.
Examples of this would be:
- To high network load / too small bandwidth
- To high database load – maybe caused my multiple reports on the same time
- Not sufficient memory (RAM) on the server / not enough free space on the hard drives of the webserver
- Proxy settings to strict (e.g. Caching, Buffering, Whitelisting)
- Load Balancer not configured correctly
- Disrupted or too long routes from the webserver to the database server / clients
- Virus-Scanner is observing the network traffic (most commonly issue)
- Maximum number of sessions on the webserver to small
- Maximum number of sessions on windows or apache not configured big enough
- ==> All that leads to performance issues and may cause these mails from time to time. Please check the mentioned points from above.
Ticket Cleanup Results
As of iAGENT version 12.6, the system automatically performs cleanups of requests that, due to various circumstances, have entered a state that cannot be corrected manually. The possible error states and the type of correction is explained in the following table. No manual action is required. The information mail is only to inform that the system has made adjustments. The cleanup run takes place 10 minutes after the system restart (routing process) once and then regularly every 24h. Since this run was only introduced with iAGENT version 12.6, it is likely that after updating from a version < 12.6 to >=12.6, this run finds entries for cleanup at the first startup and confirms them with the information mail.
Technical explanation of the cleanup run:
- Ticket cleanup takes place 10 minutes after the routing process starts, and every 24 hours from then on by default.
- The interval is configurable in Routing.conf with archive.ticketCleanup.interval (in hours, minimum 1, maximum 24, with neg. values or 0 the ticket cleanup is completely disabled).
- The delay after startup can also be reduced with archive.ticketCleanup.initialDelay (specify in minutes)
The parameter for the max. ticket age is initially 01/01/1970 – at the end of a run, the date of the last cleaned ticket is written to the ROUTING_CONFIG table with key imail.date.ticketcleanup in the format yyyyMMdd and then used as max. ticket age for the next run. This way, the runtime of the cleanup process is always limited to the amount of tickets of one day only, thus speeding up the process.
There are the following reasons for a ticket purge:
| Logging | Description | Executed cleanup action |
|---|---|---|
| history empty | History of the Ticket-ID was empty | History entry with status ERROR added |
| queue failed | History only has one entry with status RECEIVED (means that this ticket did not reach the queue finally) |
History entry with status ERROR added |
| unsent answered | Latest history entry has the status ANSWERED but ticket status is not equal. (means that this ticket has been put into the outbox but was not sent) |
History entry with status DELETED_ADMIN added1 |
| history corrupted | History already has a final status, but another status is following. | History entry with status DELETED_ADMIN added1 except if the ticket status already was ERROR, then another ERROR history entry was added |
| redundancy missing | History is correct, but status and timestamp is not equal to the archive entry. | Status and timestamps are synchronized to archive entry |
| undo processed failed | DELETED (2) status was undone but reactivation was not successful. (Ticket not in backlog) | History entry with status DELETED_ADMIN added1 |
| undo deleted failed | ANSWERED (3) stattus was undone but reactivation was not successful (Ticket not in Backlog) | History entry with status DELETED_ADMIN added1 |
| final state missing | Ticket has no final status (not in the history nor in the archive) | History entry with status ERROR added |
1 though this cleanup action, the ticket could be reactivated again. The new status has influence on the reached servicelevel of this ticket. So the timestamp of the added history eintry will be set to a time one day after the last history entry of this specific ticket.
- As COMMENT in the supplemented history entries, “{4381} – {1769}: <Reason>” is set (4381=”CleanArchive”, 1769=”Reason”).
- For all history entries added by the cleanup, the corresponding redundancy is created in Archive (copyHistoryData) and the ticket ID is written to the INDEX_QUEUE for a Solr indexing.
- If one or more tickets are selected and meet the criteria for a cleanup, a mail with a summary is then sent to the error address and also written to a separate file in tomcat/logs/routing.ticketCleanup.yyyy-MM-dd.log:
- Ticket Cleanup statistics – how many ticket corpses were selected and processed in what time, what were the reasons, how many cleanups were skipped or were unsuccessful (this statistic is also logged out).
- Details about each ticket: ID, reason for cleanup, some data from archives, entire history of the ticket (incl. added entries).