The Backlog
The backlog contains all incoming inquiries that have not yet been completed. The supervisor has access to the inquiries sorted according to the respective criteria via the individual menu items.
The default displayed columns in the different backlogs (mail, chat, claim) can be configured through system parameters with comma separated values. However, only the selection of the columns can be configured, not its order.
The system parameters are as follows:
- For mails: supervisor.backlog.default.columns.mail
- For chats: supervisor.backlog.default.columns.chat
- For claims: supervisor.backlog.default.columns.claim
Inhalt/Content
Backlog Overview
The overview shows the total number of mails available in the individual novomind iAGENT modules Mail, Chat, Call and Claim (if installed). By clicking on the respective module name you get to the overview of all open inquiries in this module.
The overview also groups the distribution of inquiries thematically:
- Channels
- Categories hierarchy
- Categories
- Agents
- Status
- Outbound
By clicking on the arrow ![]() next to the respective topic generic name, the corresponding submenu opens. The arrow then points downwards
next to the respective topic generic name, the corresponding submenu opens. The arrow then points downwards ![]() , clicking on this arrow closes the submenu again. The numbers displayed next to the individual menu items indicate how many mails are assigned to this menu item. By clicking on the menu item,the list with the assigned mails opens.
, clicking on this arrow closes the submenu again. The numbers displayed next to the individual menu items indicate how many mails are assigned to this menu item. By clicking on the menu item,the list with the assigned mails opens.
Menu structure
The overview is divided into:
- Mail: lists all mails in the system, regardless of their assignment to tenants, agents, categories and channels.
- Chat (if installed): lists all chats in the system, regardless of their assignment to tenants, agents, categories and channels.
- Claim (if installed): lists all claims in the system, regardless of their assignment to tenants, agents, categories and channels.
- Call (if installed): lists all calls in the system, regardless of their current status or associations. Even calls where the caller still is in the IVR dialogue will be displayed.
Through the context menu, additional tags may be added as well as removed from the call. Only agents that also have all the tags of the call may receive these calls.
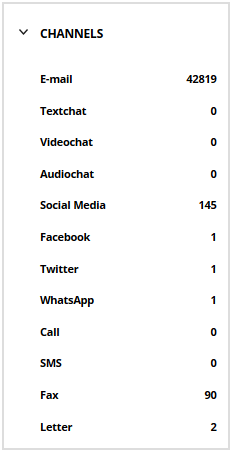 |
Channels lists all available channels in which tickets can be received. |
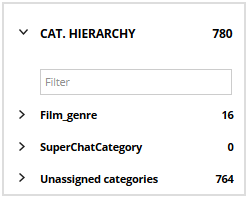 |
Category- Hierarchy lists all existing categories in their hierarchical structure. The main categories are sorted alphabetically. Clicking on a master category opens the list of associated subcategories. Exclamation mark as a marker:
|
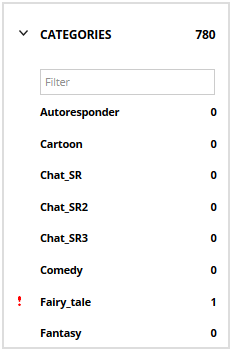 |
Categories lists all existing categories independently of the category hierarchy in alphabetical order. Exclamation mark as a marker:
|
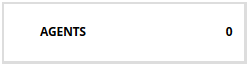 |
Agents lists all logged-in agents that have mails in their mailbox. The displayed value next to Agents does not represent the number of agents but the number of mails currently distributed to the agents. Click on the name of a specific agent to see which mails are in their inbox. |
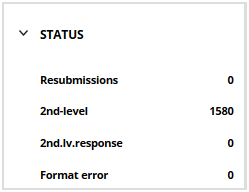 |
Status lists all mails that have a status that requires further or repeated processing. · Resubmissions: lists mails that have been put on resubmission for later processing. |
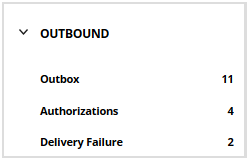 |
Listed under Outbound are all mails intended for sending. This includes mails that are waiting for approval by a supervisor, and mails that could not be delivered due to an error. · Outbox: lists all mails waiting to be sent. This also includes those mails listed under Approvals and Delivery errors. |
Mail Backlog
The mail Backlog shows all open asynchronous inquiries of the module Mail and thus are waiting for their distribution to a suitable agent. Completely unseen inquiries are displayed in bold letters. As soon as one agent or supervisor clicks on an inquiry, this will not be displayed bold any more to any supervisor.
Routing Tags
To specify the best matching agents, routing tags are introduced additionally to the categories. They are defined in the moment they come into the system through the knowledge base (see below).
The routing tags of a mail can be edited here. More routing tags usually result in a smaller set of agents suitable for replying, fewer tags in a larger one.
Mails with tags are only distributed to agents of the appropriate category that have at least the same tags stored on the user record.
Add Tags through the knowledge base
The tags can be assigned to incoming mails via the knowledge base. For this purpose, a global variable must be created in the knowledge base as a vector with the name routing_tags.
In the action code of the matching rule, the routing tag (or several tags one after the other) can then be assigned using routing_tags.addElement(“Tag-Name”);.
![]() The tags must already exist in the system (e.g. by having already been assigned to an agent via the user edit mask). Unlike categories, they are NOT created by the knowledge base when they are used for the first time.
The tags must already exist in the system (e.g. by having already been assigned to an agent via the user edit mask). Unlike categories, they are NOT created by the knowledge base when they are used for the first time.
Mails with routing tags will then only be delivered to those agents that have been assigned at least the same tags as well as the appropriate category.
The assigned routing tags appear in the backlog via an additional column Routing Tags, which can be activated if required. Tags can also be manually added or removed in the backlog via the actions button to specifically influence the routing.
A free text field in the column header enables the search for tags.
List view
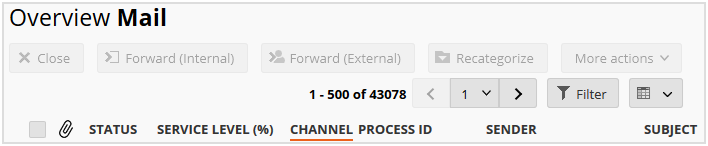
The list view informs about general and system-specific properties of existing mails.
Using the ![]() Button you can individually configure the display of the columns. By activating/deactivating the checkbox next to a mail property, the corresponding column is shown/hidden.
Button you can individually configure the display of the columns. By activating/deactivating the checkbox next to a mail property, the corresponding column is shown/hidden.
Click on the title of a column to sort the list according to this criterion. Another click on the column header sorts the list in reverse order.
- Attachment: the paper clip symbol indicates a file attachment
- Status: the current status of the mail
- Language: the language recognised by the system or assigned by an agent, in which the mail is written
- Service level: the service level of the mail; percentage ratio of age of the mail to default service level of the respective category
- Incoming account: the name of the account through which the respective mail was received
- Channel: the channel through which the respective mail was received
- Cause: the trigger of the ticket e.g. ‘Callback request’ or ‘New operation’
- Ticket ID: the individual, system assigned ID of the mail
- Process ID: if the mail belongs to an existing process, it receives this ID
- Sender: the sender of the mail; either the display name or the sender address is displayed
- Subject: the subject of the mail
- Received: the date of receipt of the mail
- Agent: the name of the agent who is currently processing the mail or who last processed it
- Tenant: the name of the tenant to which the mail is directed
- Category: the mail category recognised by the system or assigned by an agent
- Agent group: the agent group in charge (found through category)
- Location: the location to which the mail was assigned by the system or by an agent
- Routing Tags: the routing tags that are associated to the inbound inquiry and therefore are reducing the number of suitable agents (they have to have at least the same tags)
- Template: the response template that the system assigned to the inbound inquiry automatically
To filter mails from the list that meet specific criteria, click the filter button: ![]()
This opens a line with selection/entry fields below the column headers. Determine what you want to filter by either using the drop-down menus belonging to some columns or by entering suitable terms in the corresponding search fields. You can specify search factors in multiple columns to filter more precisely. If you want to filter by a criterion whose column is currently not displayed, activate the corresponding column as described above.
Status icons
From the time they are received in the system until they are closed, tickets can go through different statuses. The current status of a ticket is indicated by a graphical icon, the meaning of which you can learn by mouseover.
See the general meaning of the individual symbol elements below:
| Symbol | Meaning |
| Queued | |
| Saved as a draft; queued | |
| Check for clearance | |
| Cleared | |
| Answered | |
| Resubmit | |
| Message saved | |
| Forwarded | |
| Opened in the inbox of an agent | |
| Saved as a draft; in the inbox of an agent | |
| For clearance in the inbox of an agent with appropriate authorization | |
| Answered by an agent and waiting to be sent | |
| Resubmitted and in the inbox of an agent | |
| Forwarded and in the inbox of an agent | |
| Sending of response failed | |
| Facebook PM | |
| Forwarded externally | |
| External inquiry | |
| External inquiry exceeded its due date | |
| Ticket-ID and status unknown, the message could not be assigned to a ticket | |
| An error occurred while processing the message | |
| Marked as closed |
There are also combined statuses composed of the icon elements listed above.
For example:  The question mark symbolizes the external inquiry, the sheet stands for a saved draft and the clock for a resubmission. Thus, this status is the draft of an external inquiry that is resubmitted.
Mail view and manual routing
Click on a mail to highlight it. You can select a single mail, several or all mailss on the displayed page. If you select only one mail, the info area appears with various tabs that provide further information about this mail. Once at least one mail is selected, the five buttons Close, Forward (internal), Forward (external), Recategorize and More actions are active above the list.
![]() Closes the mail unanswered. For security reasons, the system requests confirmation of completion via a pop-up in this case.
Closes the mail unanswered. For security reasons, the system requests confirmation of completion via a pop-up in this case.
![]() Forwards the mail internally to another agent. By clicking on the button a selection window appears in which you can select a suitable agent. Using the Online check box you can filter the list according to the agents currently logged on. Only agents who are privileged and logged in for the specific tenant of the selected message will be displayed then.
Forwards the mail internally to another agent. By clicking on the button a selection window appears in which you can select a suitable agent. Using the Online check box you can filter the list according to the agents currently logged on. Only agents who are privileged and logged in for the specific tenant of the selected message will be displayed then.
You can also specify the time up to which the forwarding is to be carried out. If the system cannot forward the mail by the defined time, the mail returns to automatic routing.
![]() Forwards the mail to an external address (addresses with syntax errors are indicated by a red frame around the address field). Three options are available in the corresponding dialog box:
Forwards the mail to an external address (addresses with syntax errors are indicated by a red frame around the address field). Three options are available in the corresponding dialog box:
- Forward and close process: the mail is forwarded to an external address for information purposes, the ticket is completed.
- Forward for external processing: the mail is forwarded for processing by an agent who does not work with the novomind iAGENT system.
- Forward but continue processing: the mail is processed internally and forwarded to an external address for information purposes only.
You can also use the note field to provide the external processor with further information on the operation(3,000 characters). A note is mandatory, an empty note field leads to an error message.
Depending on the configuration, the dialog box offers options for selecting the content (original mail or reply proposal) and type (as an attachment or as a mail) of the forwarded information.
The manual routing of a mail is documented with a corresponding entry in Course.
![]() Changes the category of the mail. The list that opens presents all categories that the supervisor is allowed to see. The search field makes it easier to find a specific category. The system confirms the recategorisation with an appropriate note.
Changes the category of the mail. The list that opens presents all categories that the supervisor is allowed to see. The search field makes it easier to find a specific category. The system confirms the recategorisation with an appropriate note.
![]() Opens a drop-down menu with additional actions.
Opens a drop-down menu with additional actions.
- Process-Actions:
- Join entries: merges selected mails into one operation. The ticket ID of the oldest selected mail becomes the shared Process ID.
- Assign entries to: opens a dialog box for entering a ticket ID. The selected mails are assigned to the specified ticket and receive the process ID of this ticket. Depending on the system configuration, an assignment to non-tenant processes is also possible (for further information see System settings – Workflow tab).
Example: The ticket with the ticket ID 1234 has the process ID 5678. You assign the ticket with the ticket ID 1235 to the ticket with the ticket ID 1234. The ticket with the ticket ID 1235 receives the process ID 5678. - Split entries: disconnects the selected mails from the respective process. The separate mails receive their own ticket ID again as process ID.
- Clone processes: creates a duplicate of the selected ticket(s) with a new ticket ID for the same process ID.
- Requeue processes: Returns mails with 2nd level status to routing. Recategorization and external forwarding are then available again.
- Reroute: removes selected mails from the inbox of the processing agent and returns them to routing. A mail that the agent has currently selected and processed cannot be removed.
- Restore: ends the current status of selected mails. Depending on the status of the individual mails, this function has different effects. Your novomind project manager can provide you with more detailed information on the individual effects.
- Change location: Changes the location assigned to the ticket.
- Change language: Changes the language assigned to the ticket.
- Add memo: Adds a memo to the ticket.
- Available agents: Opens a table that shows the routing criteria in relation to the suitability of all logged-in agents. This allows to understand why a ticket is not routed to a specific agent. An agent can only receive a ticket if all columns are green.
- Print:
- Print (text): prints the mail in text format.
- Print (HTML): prints the mail in HTML format.
- Assign:
- Assign tags: Adds a tag assigned to the ticket.
- Assign claim: Assigns a claim to the ticket.
Mailinfo tabs
The Mailinfo section contains various information available on this request.
Email: Shows the content of the email and offers the possibility to enable/disable the display of the mail in HTML format, the source code display a print preview and print the mail.
Template: Shows the template assigned as a response template for incomplete mails. Shows the sent response for completed mails.
Info: The content of this tab is individually configurable
CRM: Shows meta information from the knowledge base and offers the possibility of printing it. You can also connect an independent CRM system here. For more information on configuring this tab, contact your novomind project leader.
Course: Shows information about the individual stations that the mail has passed through since it was received by the system, the type of routing, agents to be processed, such as external agents, releases, errors, interim notices, resubmissions, forwarding and queries. You can also print this information. Upon receipt of a mail, the system informs you in the respective inbox account. In case of reactivated and duplicated mails, the progress display provides a link to the original mail.
Memos: Shows the notes recorded by agents and supervisors and offers the possibility to add own notes. You can print the notes using the print icon. If available, the user picture of the respective author is displayed next to the individual notes. A red number on the tab shows unread notes. The notes may be sorted in the opposite direction through an arrow down button.
Contact tab
On this tab, relevant contact information about the contact of this request is displayed. If the contact has been linked to other contacts, all contact options of these contacts are displayed together on the tab. For more information on contact discovery and mapping, see here.
In addition, new contact options can be added quickly and easily. The system automatically ensures that no duplicates are created within a client: If another contact of the same client already exists with the newly entered contact possibility (e.g. phone number), the newly entered contact possibility will NOT be created, but the found other contact will be linked to the original one and the user will be informed about it.
On the tab, all contact possibilities of all contacts connected in this way are displayed collectively. Also the Customer Journey, which is displayed on the Journey tab, then contains all correspondences of all linked contacts together. The editing mask of the contact can be opened by clicking on the displayed ID.
Journey
The Journey displays all correspondence with this contact. If multiple contacts are linked, the correspondence from all these contacts is displayed together. For more information on contact discovery and mapping, see here.
The Journey can be viewed on a per-task or per-contact basis:
- Activity
All correspondences belonging to the same transaction of this request are displayed. - Contact
All correspondences that have been run with this contact or with all other connected contacts are displayed, regardless of their transaction number.
Filter button
In addition, a column-based text filter can be opened using the “Filter” button.
Column selection
Provides the possibility to change the displayed columns. The selection is saved at the user and is retained over a new logon.
List display
Unanswered incoming messages are highlighted with an ocher background. So it is very easy to see which open requests of the same contact still exist.
So that the list does not become too long, it has been provided with a paging. This means that only a fixed number of entries is displayed per page and you can switch to the following pages using arrow keys or direct page selection.
The list is structured in such a way that, as long as it is displayed very narrowly, it only shows the most important information (columns). As soon as you drag the info area larger with the mouse or even set it to full screen (with the maximize button at the top right corner of the mail info area), more columns are displayed. The column selection can be set via a dropdown (see above “Column selection”).
Clicking on an entry opens the detailed view of the correspondence. If another correspondence is clicked, the first one will be collapsed again, so that the list does not become endlessly long and the overview is lost.
The last clicked entry remains bold until the next one is opened. This is especially useful when searching for a specific operation, as the view can shift as content is expanded and you could otherwise lose your bearings.
There are special features when clicking on certain column contents:
- Date: Opens the history of this correspondence in a small dialog.
- Sender: Opens the detailed view of the contact in a new browser window
- Notes (small white icon at the end of the list): Opens the notes stored on the whole correspondence in a small dialog
The following columns are displayed after the Info area has been maximally enlarged in the overall view:
- Type: A small icon indicates what type of correspondence is involved. These can be, among others: incoming mail, outgoing mail, intermediate notice, external forwarding, external consultation and others.
- Channel: The icon of the communication channel. This can come from the app that brought this channel, for example.
- Directional arrows: Show in which direction the communication has gone:
Red arrow to the right: the external contact has written. This is an incoming communication.
Green arrow to the left: An agent has replied to the external contact or written about a new operation. Therefore, it is an outgoing communication. - Paperclip icon: Indicates that there are attachments attached to this correspondence.
- ID: The iAGENT internal ID of this correspondence.
 Responses to incoming requests are stored on the same ticket and therefore use the same IDs.
 - Case ID: If the request came as a response to an outgoing message, it will be automatically assigned to the same case. However, different requests can also be manually linked to one task by the agent. In both cases the process ID differs from the ID. If you sort the view by process ID, all correspondences to the same process will be displayed one below the other.
- Date: Displays the date and time of the receipt/issue of this entry. A click opens the whole history of this entry in a small dialog.
- Sender: Shows the sender. A click on the content opens the detailed view of the contact in a new browser window.
- Recipient: Shows to whom this correspondence was addressed.
- Category: The final category of this correspondence. In the case of intermediate replies, external queries, and redirects, the final category of the associated request is also displayed, since these request types do not have their own categories. Thus, they may change during the course of a request.
- Preview: Provides a brief insight into the correspondence. For example, for mails it is the subject, for chats it is the first lines of the communication.
- Note icon: Opens a small dialog that opens all notes belonging to the same transaction. Since in the performant data source of the journey the information whether notes are attached to the same task cannot be inserted meaningfully, the journey has no information about whether notes exist at the task. Therefore, the icon is displayed even if no notes exist.
Chat Backlog
Running chats are displayed in the chat backlog.
Routing Tags:
Chats that have been started by the chat frontend via the REST API can be passed routing tags (in addition to the category), which will be taken into account when finding suitable agents.
![]() Routing tags that are passed via the REST API must already exist in the iAGENT system and be assigned to users. They are not created automatically.
Routing tags that are passed via the REST API must already exist in the iAGENT system and be assigned to users. They are not created automatically.
A special feature exists for chats that have been received via a Messenger inbox account and are answered automatically by chatbots. For these chats, the status Chatbot can be seen. They can be transferred directly to the queue for answering by real agents via an action button (see “Transfer to queue” below).
Close:
Closes an active chat that has been selected in the list
Foward:
Forwards the selected chat to an agent that has to be chosen from a little dialogue popup.
Recategorize:
If the selected chat is still in queue or with a chatbot and is allowed to be recategorized from its category, this button can be used to change the category of the chat. If the chat is routed externally during the recategorization, the external routing will be cancelled and the chat will be re-routed according to the new category in the next routing cycle. If the chat is already signaled to someone, the signaling will be canceled. The recategorization will be marked in the chat history and in the database.
Assign tags:
If the tagged chat is still in queue or with a chatbot, this button can be used to change the routing tags or create new tags. If the chat is routed externally during recategorization, the external routing will be cancelled and the chat will be re-routed according to the new category in the next routing cycle. If the chat is already signaled to someone, the signaling will be canceled. The change is marked in the chat history and in the database.
Submit to queue:
Chats with type “Chatbot” and “Resubmission” can directly be forwarded into the waiting queue and will be distributed to a suitable agent as soon as possible.
Call Backlog
The Call Backlog shows all ongoing or waiting calls that are processed via the iAGENT system. After clicking on a displayed call, relevant information about this call is shown.
The counter for the servicelevel time is stopping as soon as the call is answered for the first time.
Routing Tags
The routing tags of a call can be edited here. More routing tags usually result in a smaller set of agents suitable for answering, fewer tags in a larger one.
Calls with tags are only distributed to agents of the appropriate category who have at least the same tags stored on the user record.
Connection between call and ticket
Tickets and calls can be connected via the supervisor backlog or via the search in the Supervisor or Desk. For this purpose, another action has been introduced below the Actions button.
Claim Backlog
All open claims that are currently in the system. Clicking on a line opens the available details for this claim.
Resubmissions
This folder contains mails which the agent has chosen to postpone (for resubmission) in order to be able to process other mails in the meantime or to continue processing a mail when a given due date has been reached.
In the “Resubmissions” folder, the column “Maturity” is displayed instead of the column “Service level”. The value displayed therefore indicates the time at which the ticket is delivered to an agent again. In an analogous manner to all other columns, it is possible to sort according to this column too, by clicking on the column heading.
You can view the course that the mail has taken up to the last resubmission via the mail status icon. If you select a mail using this option, the icon will be displayed in red. You can see until when a mail has been postponed by checking the Comment section in the last column of this list. The previous columns provide information about the time, status, sender and recipient of the mail. The resubmission time and the agent responsible for the mail can be viewed using the tool tip provided.
Mails can be resubmitted any number of times. Each time the process is used, it is documented in the detailed view.
To re-route mails from this folder back to the general workflow select the mail and click the button Restore on the menu bar. You will then find the mail back in the general inbox.
Mails can now be recategorized while in status Postponed. After recategorization, the mail will automatically remain in status postponed.
2nd-Level
The 2nd-Level folder contains all mails that have been sent to persons, having no access to novomind iAGENT, via the forward feature (provided these mails have not been marked as Closed). This refers to both external inquiries and external forwards. If external inquiries are answered, the relevant mails are displayed in the folder 2nd-level response.
As soon as an external forwarding has been answered by the recipient, the mail disappears from the 2nd-level folder. In this way, it is possible to monitor when the external party has answered the forwarded mail.
2nd-Level-Response
The 2nd-Level-Response folder contains all mail responses from external agents which were sent via the inquiry feature. The response mails will remain in this folder until the original mail for which this response was provided has been answered or deleted by an agent.
When a second level reply is marked with a red flag, it could not be assigned to a corresponding ticket.
Depending on the configuration (Administration –-> System –> System Settings –> Workflow), replies to external inquiries in this folder are automatically routed to the agent who lodged the inquiry as soon as they are logged into the iAGENT Desk. If the agent is not logged in, the original mail is queued for normal routing. Thereby, the reply of the external officer is also sent to the responsible agent. This means that if an agent who initially forwarded the original mail is not logged in when the external officer replies, the original mail and the answer are sent to an available agent.
Format-Error
The section “Format error” lists all mails which could not be processed by the Routing module but which have still managed to enter the novomind iAGENT system. This can occur if a mail has no Ticket ID (e.g. because they have already been closed during one of the previous processing steps) or if a mail re-enters the novomind iAGENT system even though it has already been fully processed. Errors which prevent a mail from being recognized mainly stem from hidden header contents or in the flag area of the mail. To display this area (source code), click on the SRC tab in the info-area (if configured).
For mails that require further processing, you can attempt to solve the problem that has led to the format error in the first place and then channel the mail back in to the workflow using the Restore button.
Mails that require no further processing can be removed from the workflow with a single click of the mouse. Simply select the Close button.
Outbox
Every mail sent from the Routing module to the novomind iAGENT system (e.g. as a response to a customer mail) is stored briefly in this outbox folder.
Mails with an incorrect To-Address that have caused a send error can be corrected directly in the outbox folder. Therefore, click on the relevant mail. The field To in the header line is clickable. A window is opened, in which the mail address can be corrected. Afterwards the mail can be resend with Send/Clearance.
If you click on the Close button located in the top button bar while in this folder, the original message (i.e. the message transferred to the outbox) will be removed from the outbox. The relevant mail is now located once again in the inbox folder. The workflow for this mail will not be closed and you will still be able to create a new mail response.
Note: Clicking “Close” for a mail currently awaiting clearance will close that mail and remove it from the clearance process. More information on this point can be found in the following section.
Red Flagged Mails
There are many reasons for mails being retained in the outbox and carrying a red flag. For example, there can be replies to external forwards where the initial mail has been forwarded without closing but (in the meantime) has been closed or replied to in novomind iAGENT. For novomind iAGENT, it means that the particular mail was closed without a reply. The external reply will remain in the outbox with an according flag in order to avoid an accidental duplicate or even different reply.
Another possible reason giving rise to a red flag is sending a mail directly to one of the internal outbound system addresses (sending mails to the address, which is used for automatic forwarding responses from external forwarded mails).
By clicking on the button Restore, you can restore the mail into the outbox and forward it to an agent for processing. You can also remove the mail from the workflow by clicking on the button Close.
Clearance-Option
The clearance option enables a mail to be verified one last time before it is dispatched. You can stipulate that mails should be cleared by an authorized supervisor or agent before being sent using the menu options User administration and Edit categories.
If mails requiring clearance are removed from the outbox by clicking Close, they will be closed. This enables the supervisor to delete mails from a particular process if, for example, the mail was answered unnecessarily by an agent or if the response cannot be sent because the sender can no longer be reached (see chapter Format-Errors).
You can define whether mail from specific agents require clearance in the user profile section (see Chapter Users), or whether mails from a particular category should be cleared before dispatch using the configuration menu (see Chapter Categories) via the checkboxes Clearance required.
Supervisors who have been authorized to clear mails can view mails awaiting clearance in their mail inboxes and dispatch them after verification by clicking on the Send/Clear button in the central button bar. Any mail attachments can also be viewed. If a mail requires additional processing before dispatch, the supervisor can log on to the novomind iAGENT Desk – provided that they are authorized to do so – and process the mail there or forward it to another agent. In this case, the supervisor simply selects the mail in question and clicks on the “Forward” button to send it on to an agent who is currently available.
If the mail recipient needs to be changed, this can be done by clicking on the current recipient name. An input window opens in which the receiving address can be modified or substituted.
Authorization
The folder Authorization contains all mails requiring clearance. The mails awaiting clearance can be sent from this folder or returned to the processing agent. All versions of a reply mail created by the agent requiring clearance are saved in this folder. This means that changes can be monitored during the clearance process. If the status filter in the central outbox is deactivated, clearances are also visible in the central outbox.
The clearance folder is only visible if it has been assigned in the rights assignment of the respective group.
Replies of agents that require clearance (like other replies) are archived and can be viewed via the course. After the Agent has sent the reply, the corresponding entry is created in the course of the mail.
All release versions are archived. i.e. they are saved and can firstly be viewed via the course of a mail and secondly via the status of a mail in the search results list. The versions are depicted as follows in the course of the mail. The original reply of the Agent is given the title Reply. Newer versions can be discerned via the entry Modified. These entries are inserted as a link via which the detailed view of the respective version can be opened.
As described above, the clearance versions can also be viewed by clicking the status of a mail in the search result list.
The depiction of the versions is done at this point in an analogous manner to the course described above via the highlightings Reply and Modified. The detailed views can also be called up via a click on the respective entry.
Delivery-Failure
This folder contains all delivery failures created when sending mails from novomind iAGENT. Any mails causing a delivery failure are reactivated and stored in this folder.
After selecting a mail that has caused a delivery failure, Ignore can be selected from a context menu. Therewith the initial status Replied/Sent can be restored if the delivery failure was caused by an erroneous CC or BCC address and if the To recipient received the mail so that resending it is not necessary.
If the status filter in the central outbox is deactivated, delivery failures are also visible in the central outbox. The clearance folder is only visible if it has been assigned in the rights assignment of the respective group