
Monitoring
Inhalt/Content
Overview

The History dropdown has been renamed to Trend in iAGENT versions > 11.15.
In the overview you will find a dashboard with key performance indicators. The composition of the dashboard and the arrangement of the displayed information can be configured individually. You can use  -button to define which data should be displayed:

Use Drag&Drop to define the positions of the individual tiles with the corresponding data. Use the filter options to refine the data displayed in the tiles. The history only effects the trend arrows on the right side of the tiles. A red frame around a tile indicates that a limit has been exceeded at this point.
Values:
The monitoring always refers to the current value, so the example Received Mails always shows the current input (from 0 o’clock). The same goes for Answered Mails.
Changing the switch at the top (e.g. to History: Week ago) only affects the displayed trend below the values. For example Up to 500% and ascending/red arrow.
The numbers themselves are not influenced by the selection list.
Realtime Overview
This functionality has not yet been adapted for the new Supervisor user interface. Instead, the template of the old user interface is included.
The realtime overview shows currently open mails for the selected categories – grouped by processing status. Also displayed are the number of agents configured for each selected category and the number of agents for that category that are currently online. Results can be restricted to specific categories by category selection.
This provides an overview of all mails currently located in the system and which have not yet been fully processed, including a status indication as follows:
- To be processed
The sum of all mails for a particular category which have not yet been fully processed (total of “Queued”, “Active”, “Resubmit”, “Inquiry” and “Forward”). - Mails > SL
Mails which have exceeded the Service-Level - Queued
All mails which are currently queued (i.e. no agent is working on them at present) - Active
Mails which are currently routed to an agent - Check for Clearance
Mails which are currently checked for clearance - Resubmit
Mails which have been postponed for processing at a later time
Category Overview
In this chart you can see at a glance the total number of tickets each category, tenant or Incoming account received in the selected period. The result is also influenced by your selection for the other settings tenant and channel.
Category tab
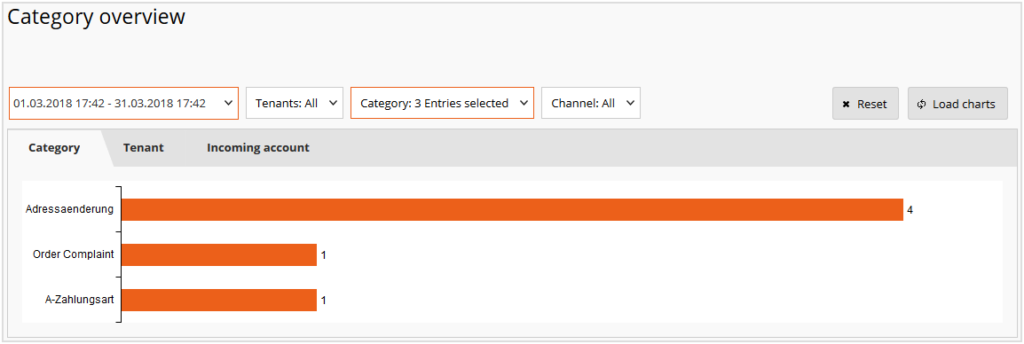
The chart shows the tickets received in the specified time period per category. The default filters for tenants, category and channel are considered when creating the chart.
Click the  button to reset the default settings or vary the filters as desired.
Click  to create an updated chart with the changed settings.
Tenant tab

The chart shows the tickets received in the specified time period per tenant. The default filters for tenants, category and channel are considered when creating the chart.
Click the button to reset the default settings or vary the filters as desired.
Click to create an updated chart with the changed settings.
Incoming account tab

The chart shows the tickets received in the specified time period per incoming account. The default filters for tenant, category and channel are considered when creating the chart.
Click the button to reset the default settings or vary the filters as desired.
Click to create an updated chart with the changed settings.
Transaction quota
The chart depicts how many tickets the respective agents have completed per hour on average within the defined time period in the Mail, Chat and Call modules as well as in total. The list can be filtered by agent, agent groups and tenants (numbers for Chat and Call as of version 12.18).
The orange area shows the value for the Mail module, violet for Chat and green for Call. A mouse-over on the bar shows the absolute values for each of the modules.
By default, data from the last 24 hours is displayed for all agents active during this period. Click to return to the default setting from a selected period.
Select an individual period, one, several or all agents via the calendar and then click to display the information for this period.
Agent status
The chart shows the current status (current session) of all agents.

The first column STATUS shows an icon for each Agent, indicating their current status: Online (or Ready):,  Pause:
  , Offline:
  .
.
It is possible to change an agent’s status from Pause (or post processing) to ready, but not vice versa. To do so, highlight the agent’s row by ticking the check box at the beginning, then click the button “*SET AGENTS TO READY” above the list.
In the other columns you find the following information:
- Name: Name of the respective agent
- State change: Type and time of the last status change
- Agent groups: Agent groups of which the agent is a member (separated by commas)
- Language Skills: Language skills of the agent as configured for routing
- Channel Mail/Channel Chat/Channel Call: Availability of the agent in the respective module (available/unavailable)
- Break time: Total pause time duration during the current session
- Work Break Reason: Current reason for a break
- Busy-time: Total amount of time that the agent was busy with phone calls (incl. ringing time, excl. post-processing) during the current session
- Mail edit-time: Amount of time that the agent is working on the current mail (value is only displayed if the agent is currently working on a mail)
- Mails: Number of tickets the agent currently has in the personal inbox and the number of tickets configured as the maximum for routing
- Chats: Number of chats the agent is currently processing and the number of chats configured as the maximum for routing. If the agent is not available for chats (e.g. offline, pause, not ready for chats), the agent is displayed without any free chats, i.e. the maximum number of chats is equal to the current number of chats.
- Process: ID of the process that the agent had opened at the moment of the data request
- Category: Category of the opened process
- Total time: Amount of time that the agent has spent in mail mode
- Mode: The mode the agent is currently in (In mail mode or In chat mode)
The following columns only appear when the iAGENT Call module has been activated:
- Device-ID: Device number of the agent
- Call-ID: iAGENT unique Call-ID
- Source: Caller’s phone number
- Destination: Phone number which the caller has dialed
- Channel: Specific call channel
- CTI-Status: Current call status of the agent
Online times

The chart shows a timeline of the selected time period (the default setting is the last 24 hours) with the online times of all agents logged in during this time period. Active times are coloured green, pause times red. You can get more detailed information about the respective times by moving the mouse pointer over a certain period of time and staying there.

With the buttons  and
and  you have the possibility of changing the scale of the timeline. Magnification allows adjustment to the second, and reduction to 24 hours (default setting).
For a more specific display, in addition to the time period, you can specify that only the data of agents of specific tenants or agent groups is listed. You can also explicitly define the agents whose information is to be displayed in the chart.
After you have specified your settings, click to see the result.
Chat status

In the table you can see all currently logged-on agents as well as information about:
- Location: Location to which the agent is assigned.
- Status: Mode that the agent is currently active in. For agents “In mail mode” but ready for chats, the difference between maximum and current number of chats is > 0 (in the Chats column).
- Chats: The number of chats the agent is currently processing and the number of chats configured as the maximum for routing. If the agent is not available for chats (e.g. offline, pause, not ready for chats), the agent is displayed without any free chats, i.e. the maximum number of chats is equal to the current number of chats.
- Sum of Chats: Number of chats the agent has had so far during the current session.
- Total time: Total time the agent has spent in chat mode so far.
Use the filters to sort the list according to your requirements.
Received Mails
The following charts show you how many tickets have been received in the selected period and prepare the data according to the defined parameters.
First determine the time period and then select for which tenants, which input accounts, which categories and which channels the respective chart is to be created.

Then click to see the result.
Category tab

The graphic shows the ticket volume in the selected categories during the defined period with consideration of the additionally selected properties for tenants, inbox account and channel.
Move the mouse pointer over the individual graphic elements to obtain a precise breakdown of the inputs on a specific date. You can also hover over a specific category name at the edge of the chart to highlight events related to that category.
If you click on the category name, this category is filtered out of the chart.
Click to discard the settings.
Tenant tab

The graphic shows the ticket volume for the selected tenants during the defined period, taking into account the additionally selected properties for Category, Incoming account and Channel.
Move the mouse pointer over the individual graphic elements to obtain a precise breakdown of the inputs on a specific date. You can also use a concrete tenant name at the edge of the chart to highlight the events for this tenant.
If you click on the tenant name, this tenant is filtered out of the chart.
Click to discard the settings.
Account tab

The graphic shows the ticket volume in the selected incoming accounts during the defined period, taking into account the additionally selected properties for Tenants, Category and Channel.
Move the mouse pointer over the individual graphic elements to obtain a precise breakdown of the incoming elements on a specific date. You can also hover over a specific account name at the edge of the chart to highlight events related to that account.
If you click on the account name, this account will be filtered out of the diagram.
Click to discard the settings.
CTI Error
The list shows the CTI errors of the last 7 days
Columns:
- Date-Time : Exact timestamp of the error
- Email-ID: novomind iAGENT internal Call-ID
- Call-ID: External call-id received from the phone system (pbx)
- Text: Error message
Automatic refresh: Refreshs the list automatically every few seconds if checkmark is set.